Working with audits
Running an audit
When you open a template, ProAudits creates a brand-new audit and takes you straight to it. Your job, from there, is simple: work through the checklist, attach photos where useful, and submit at the end. Everything saves as you go — you can close the tab, lose connection, or switch device, and your answers will be waiting.
Audit page
The audit header
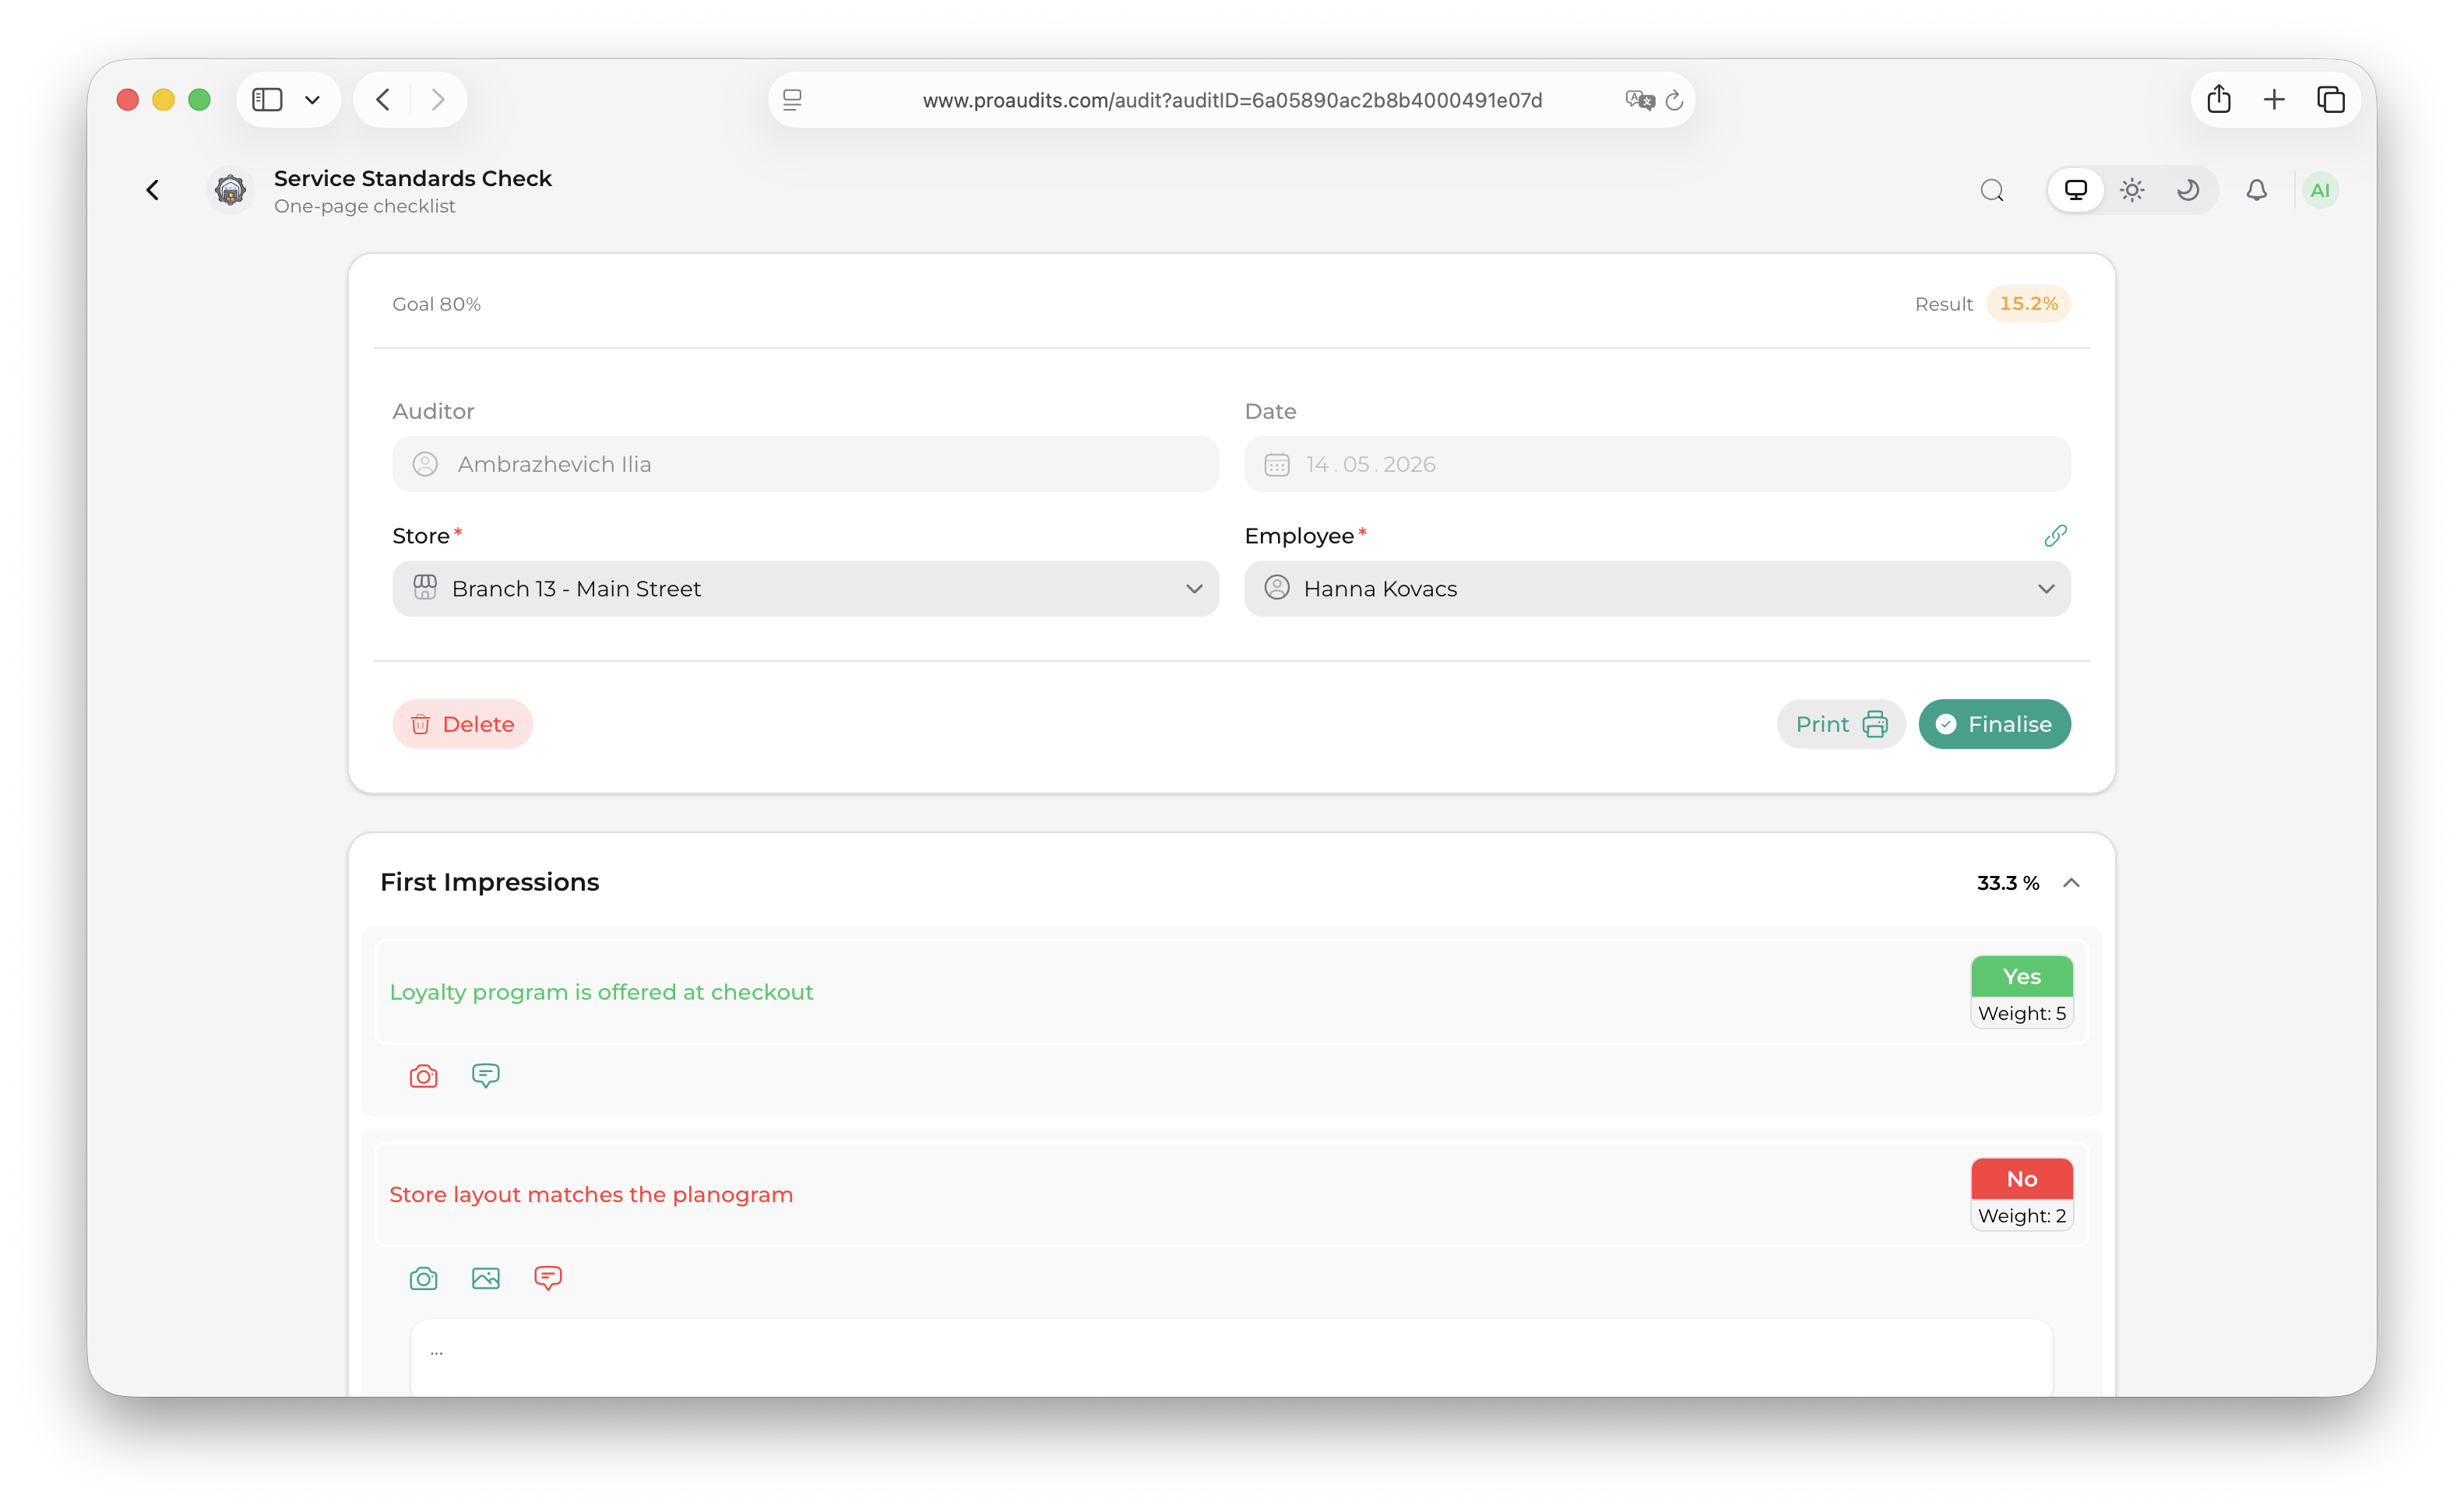
The header at the top of every audit is one card with three strips: a thin score strip at the top, a details grid in the middle, and a toolbar at the bottom. It is your at-a-glance summary of the audit — and also where you set the two pieces of context every audit needs: which store you are visiting and who the auditee is.
Audit header

Score strip (top)
Two numbers, always visible:
- Goal on the left — the target percentage the template designer set in the blank editor. Constant for the audit.
- Result on the right — your current weighted score as a colored chip:
- Grey when the score is still 0 (you haven't answered anything that affects it yet).
- Green when you have met or exceeded the goal.
- Yellow when you are below the goal.
The chip updates live as you answer items — handy for knowing whether your audit is trending toward a pass.
Details grid (middle)
A 2-by-2 grid of four fields:
Auditor (read-only)
The person who started the audit. Set automatically from whoever clicked the blank in Blanks. It cannot be reassigned from this screen.
Date (read-only)
The audit creation date. Locked once the audit is created.
Store (autocomplete, required)
The location you are auditing. While the audit is in progress this is a searchable drop-down listing every store you have access to (your home store plus any extra stores your account was granted under the Structure editor). Start typing to filter; the matcher uses contains-style search so any part of the name works.
Store autocomplete
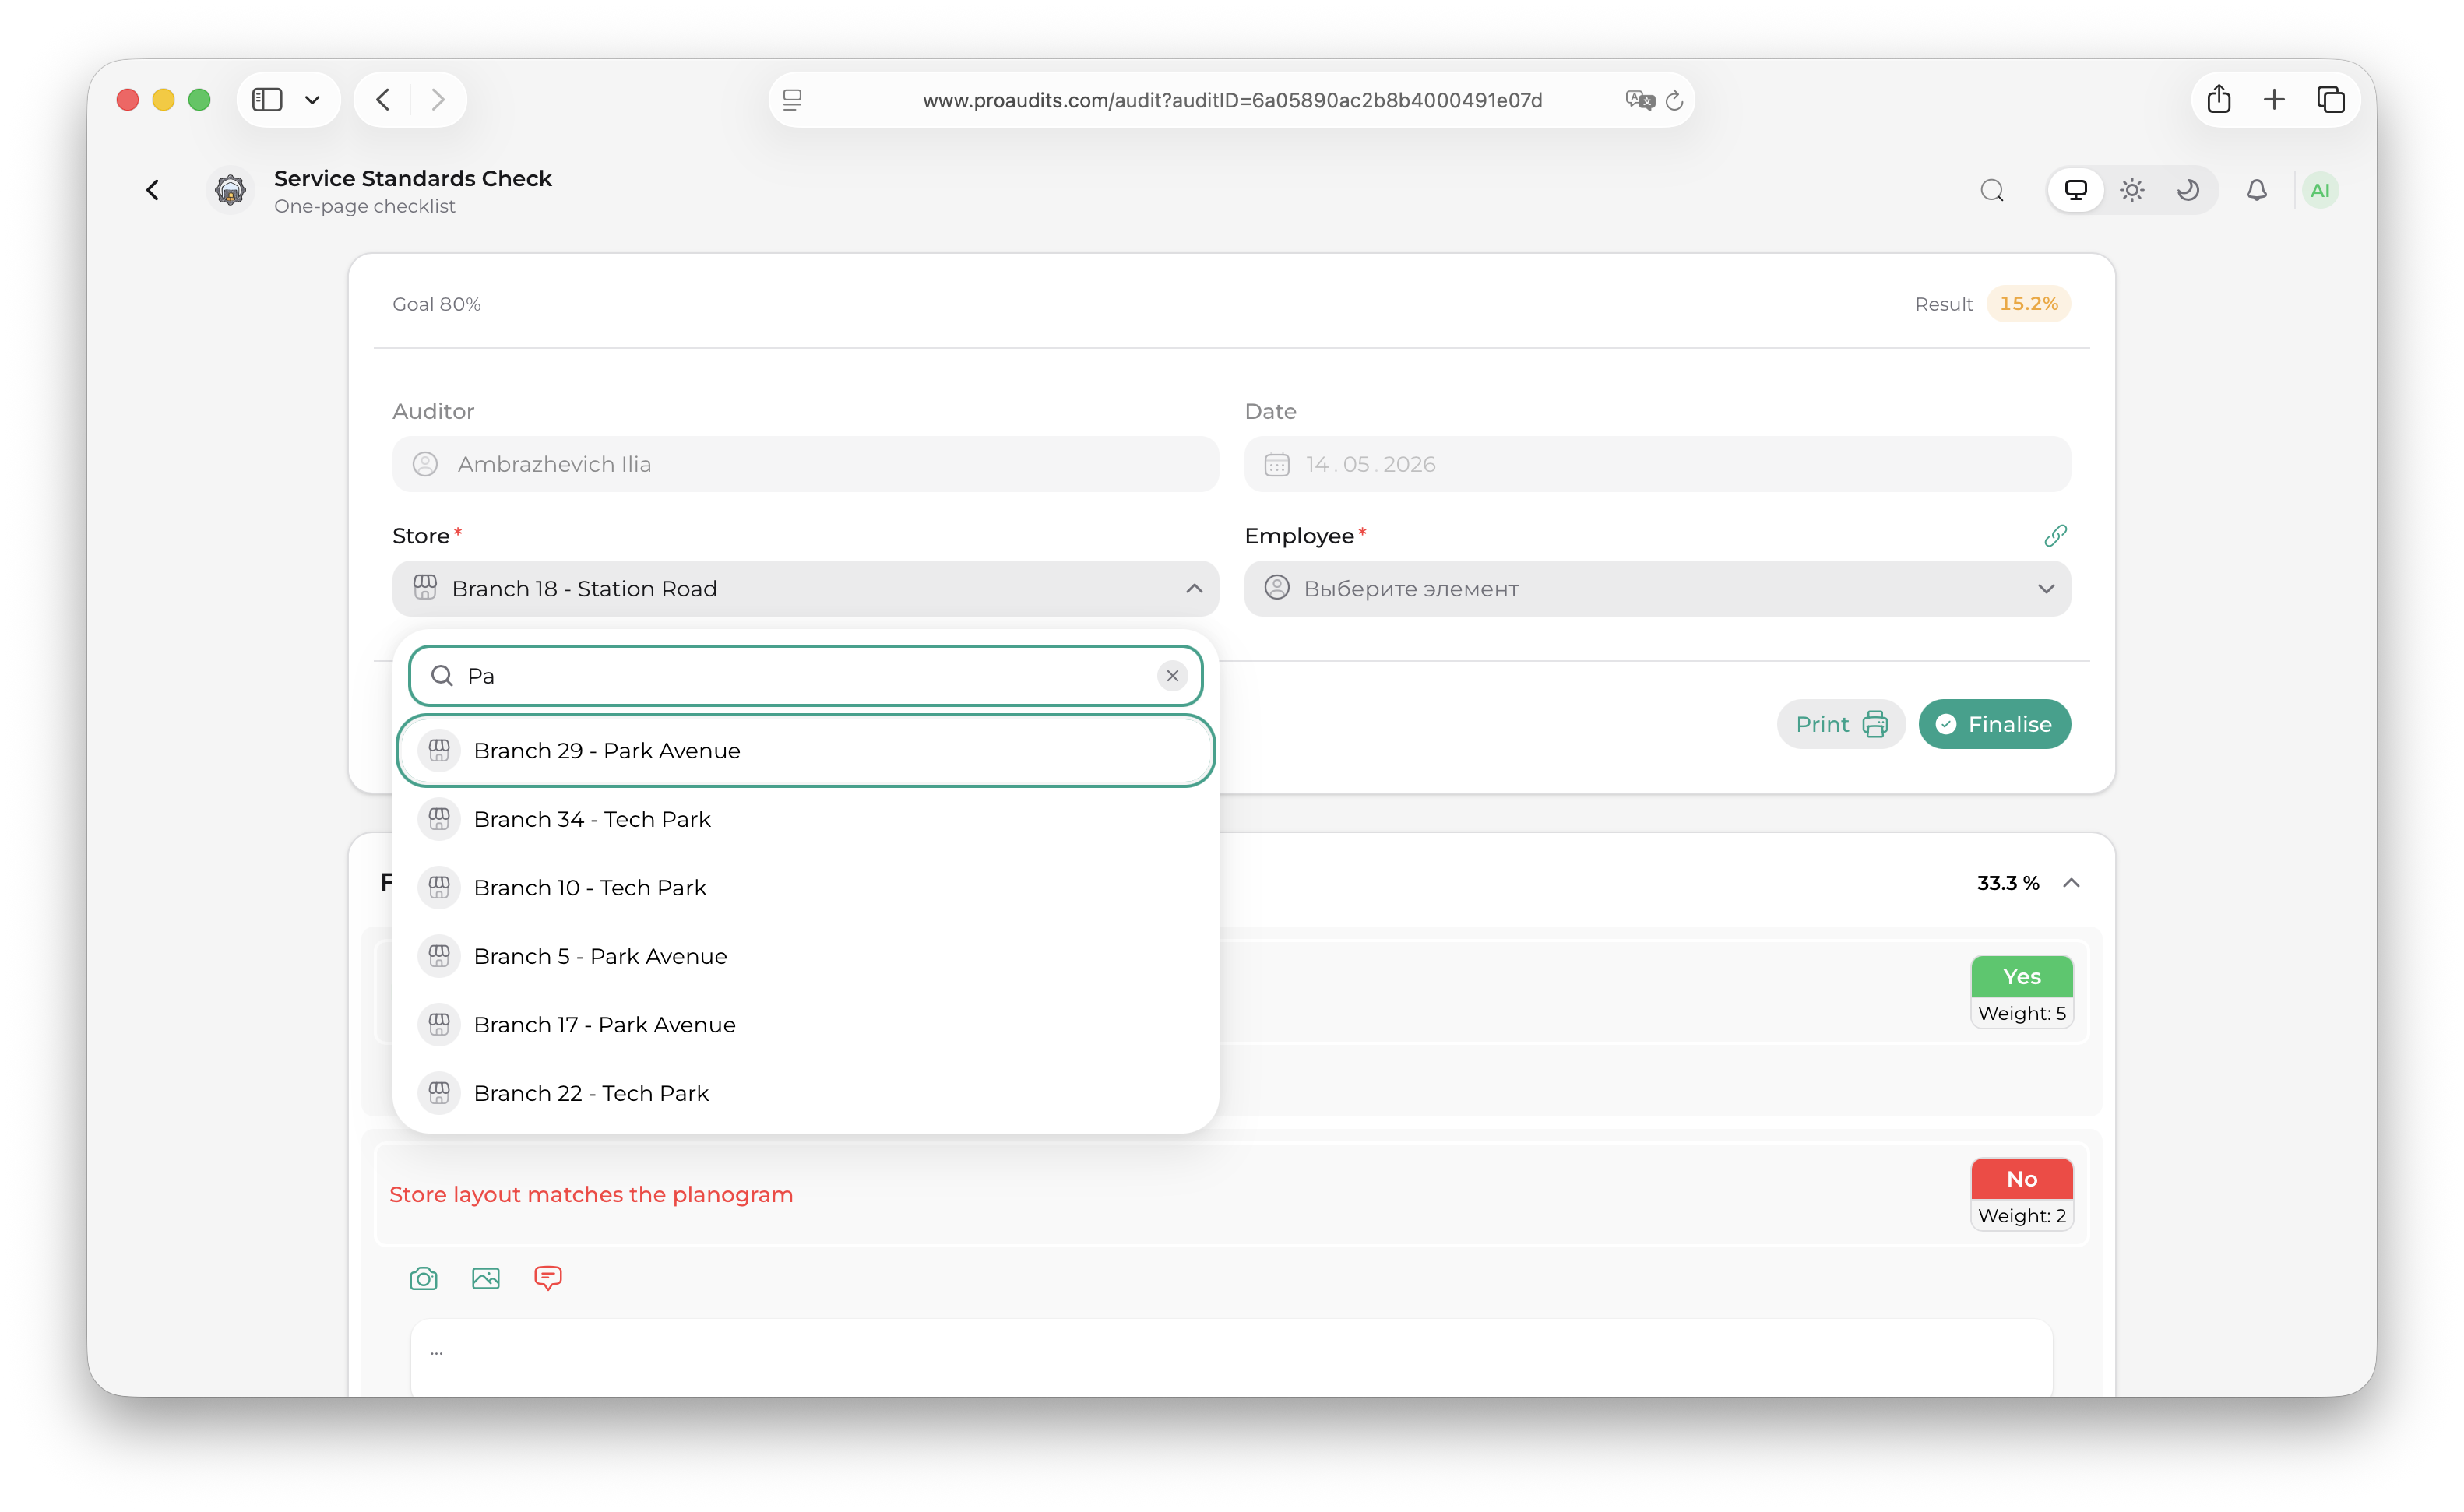
Shortcuts and rules:
- If your account is bound to exactly one store, ProAudits picks it for you the moment the audit opens — no clicks needed.
- The store is required. You can fill items in beforehand, but the Ready-to-finish modal will block submission until a store is chosen.
- Once the audit is finished the field locks to a read-only text display showing the chosen store's name.
The store you pick here determines two important things downstream:
- Which employees show up in the Auditee picker (next field).
- Which employees the system suggests as responsibles when you mark an item No — see Answering "No".
Auditee — "Employee" (toggle field, required)
This is the person you are auditing — the manager on duty, the shift lead, the crew member whose work you are checking. It is required, and it has two modes controlled by a small link icon to the right of the label.
Auditee in store-team mode
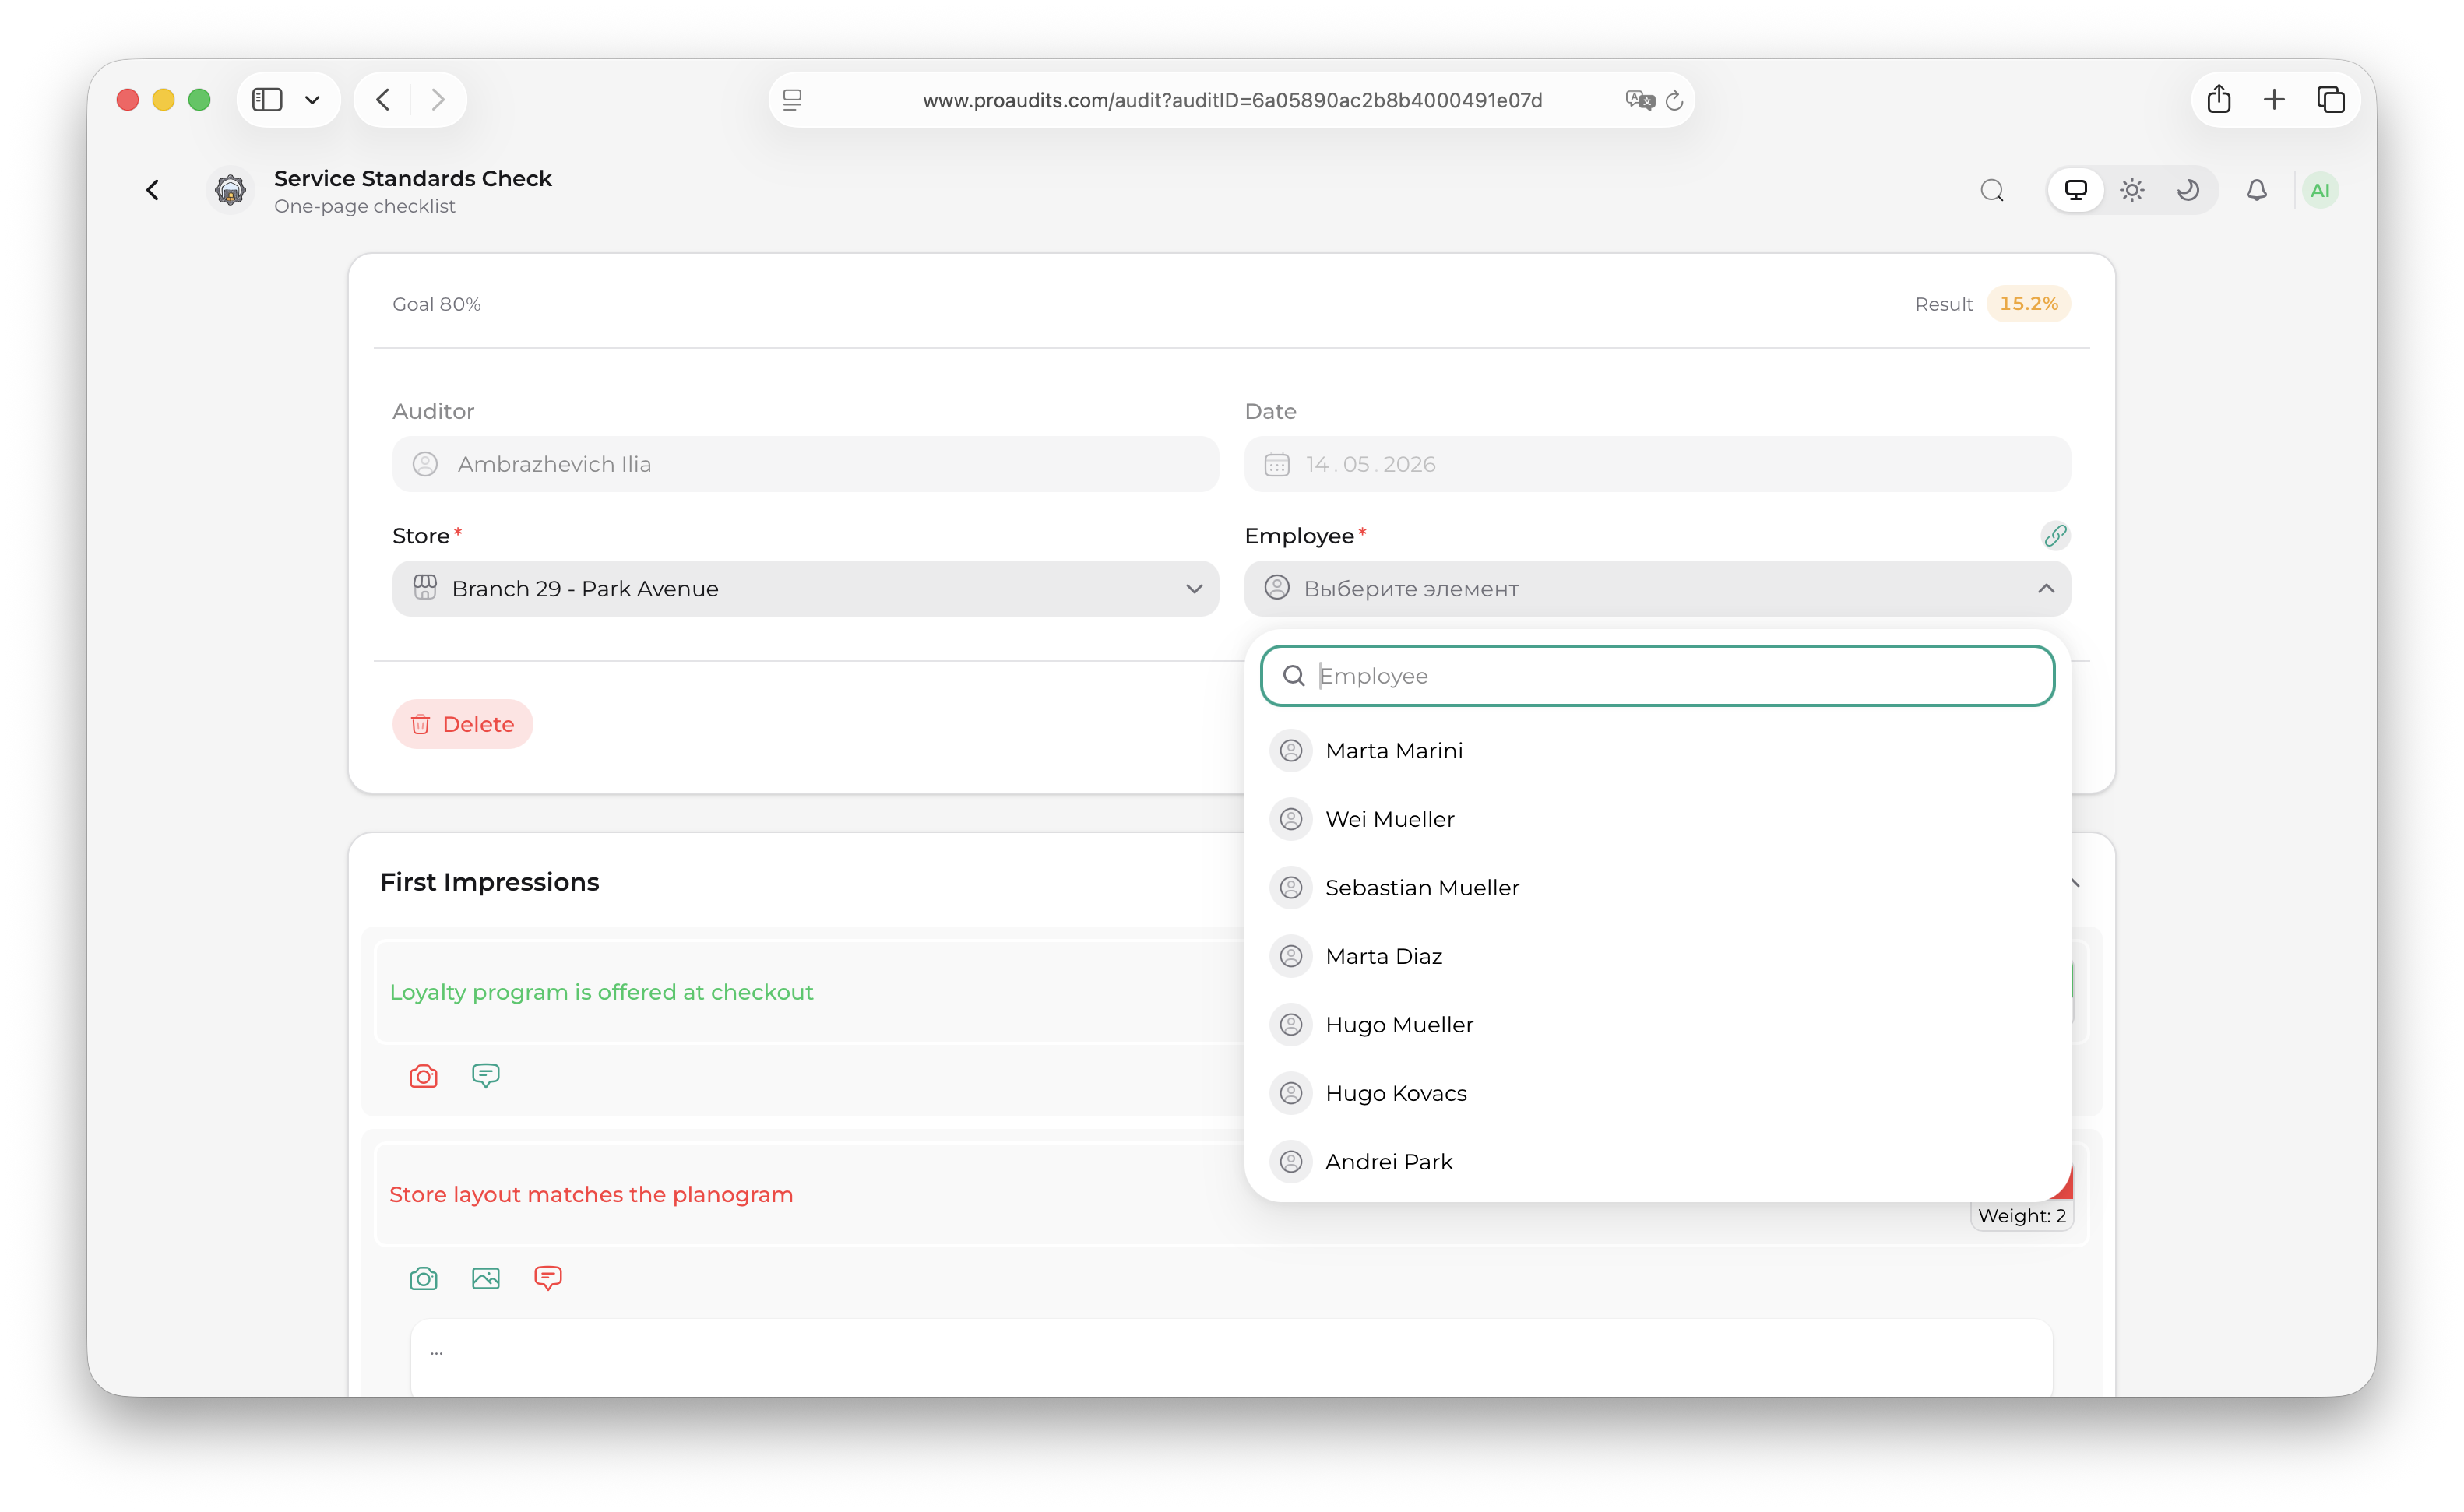
Mode 1 — pick from the store team (default)
When the link icon is teal (active), the field is an autocomplete drop-down listing the store's team members. The list is built from three filters working together:
- The person must be assigned to the store you just selected. People who work elsewhere never appear.
- They must have a role in the system. People without an assigned role are skipped.
- Their role's level must be one of: Store manager, Shift manager, or Employee (in that priority order — store managers appear first, then shift managers, then crew). Area managers, editors, admins, and read-only users never appear in this list, even when they happen to be linked to the store — they are not the people audits check on.
Start typing to filter; pick a name and that person becomes the auditee.
Mode 2 — type a free-text name
Sometimes the right person isn't on the roster yet — a brand-new hire, a contractor, a guest from another store covering a shift. Tap the link icon to flip the field into free-text mode (the icon turns grey) and just type the name you want recorded.
Auditee in free-text mode

Free-text names don't link to a user account, so they won't appear in dashboards as that person, and they can't be auto-assigned as a responsible on No items — but they preserve the audit record exactly as you typed it. Flip the icon back on at any time to switch to picking from the roster again.
Both fields stay locked once the audit is finished.
Toolbar (bottom)
The bottom strip of the card holds the audit's main actions. The buttons change depending on whether the audit is still in progress or already finished.
While the audit is in progress:
- Delete (red, on the left) — soft-deletes the audit. A confirmation dialog appears first. This option is disabled for finished audits unless your role is Admin.
- Print PDF — generates a printable summary.
- Finalise (primary teal) — opens the Ready-to-finish modal, the pre-flight check before submission.
Once the audit is finished:
- Delete is hidden unless you are an Admin.
- Start / finish time appears in the middle, formatted as
HH:MM – HH:MM. - Print PDF and Export to Excel are the two ways to take the result out of ProAudits.
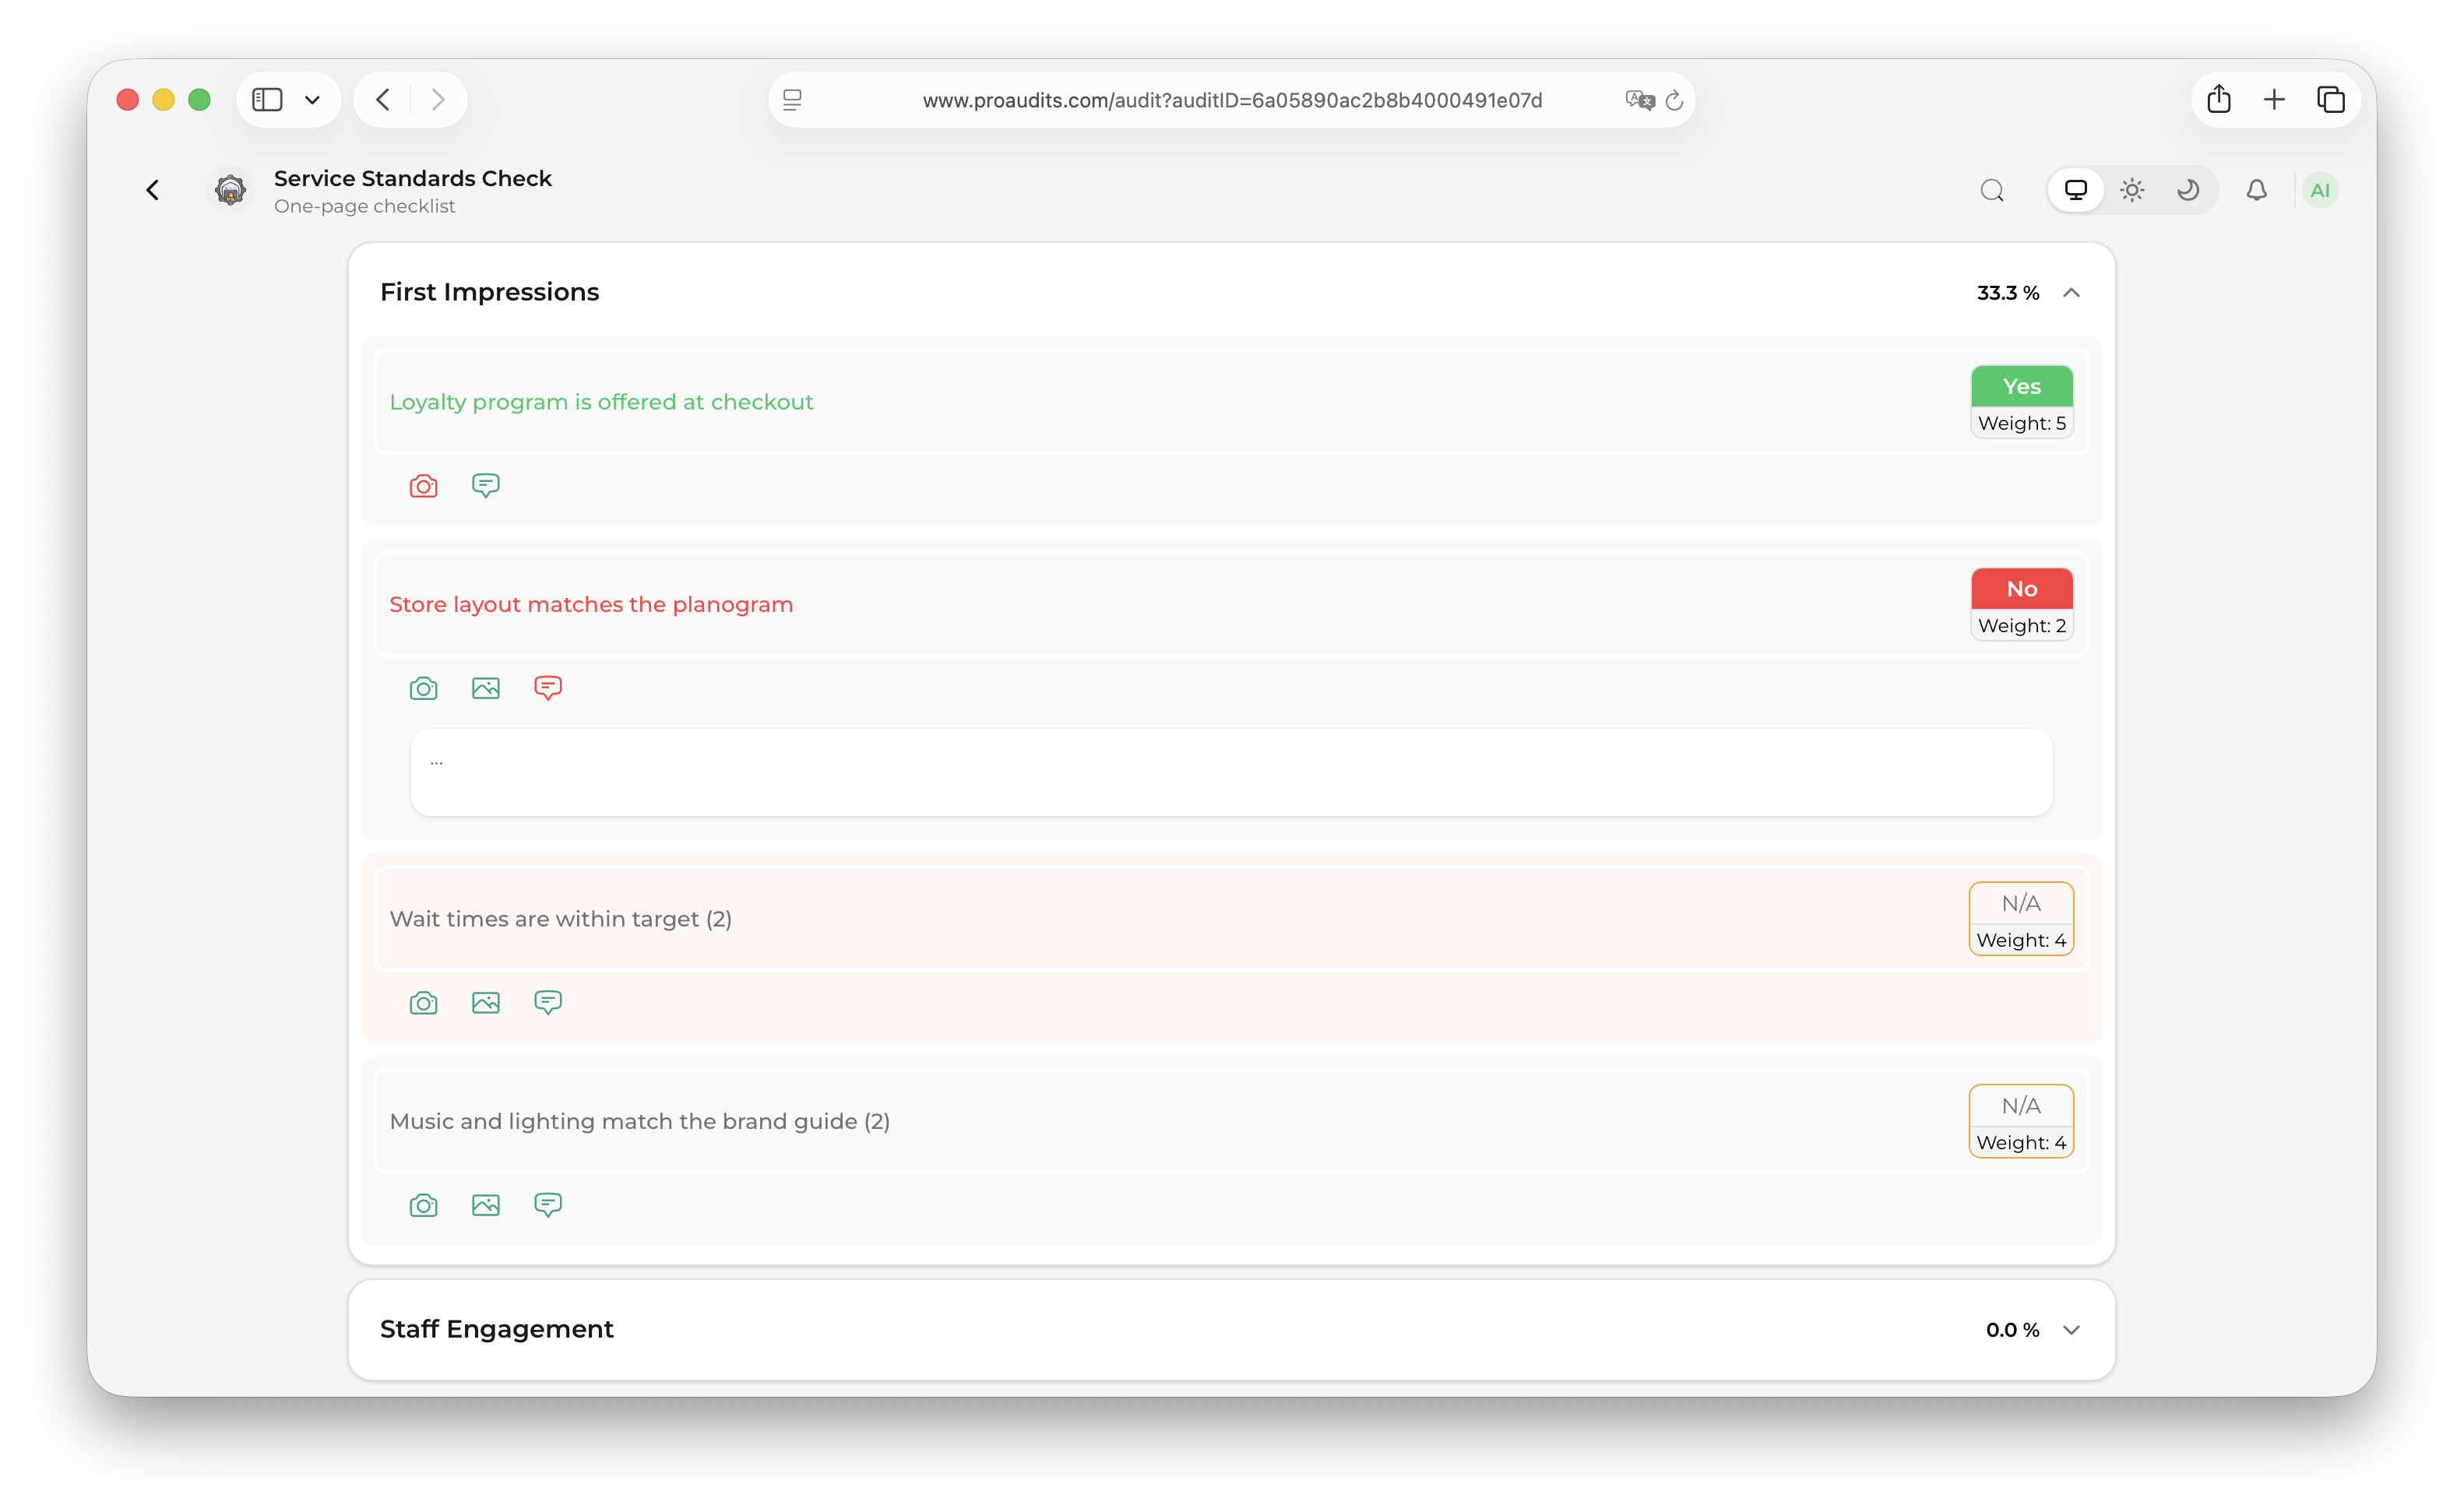
Working through the items
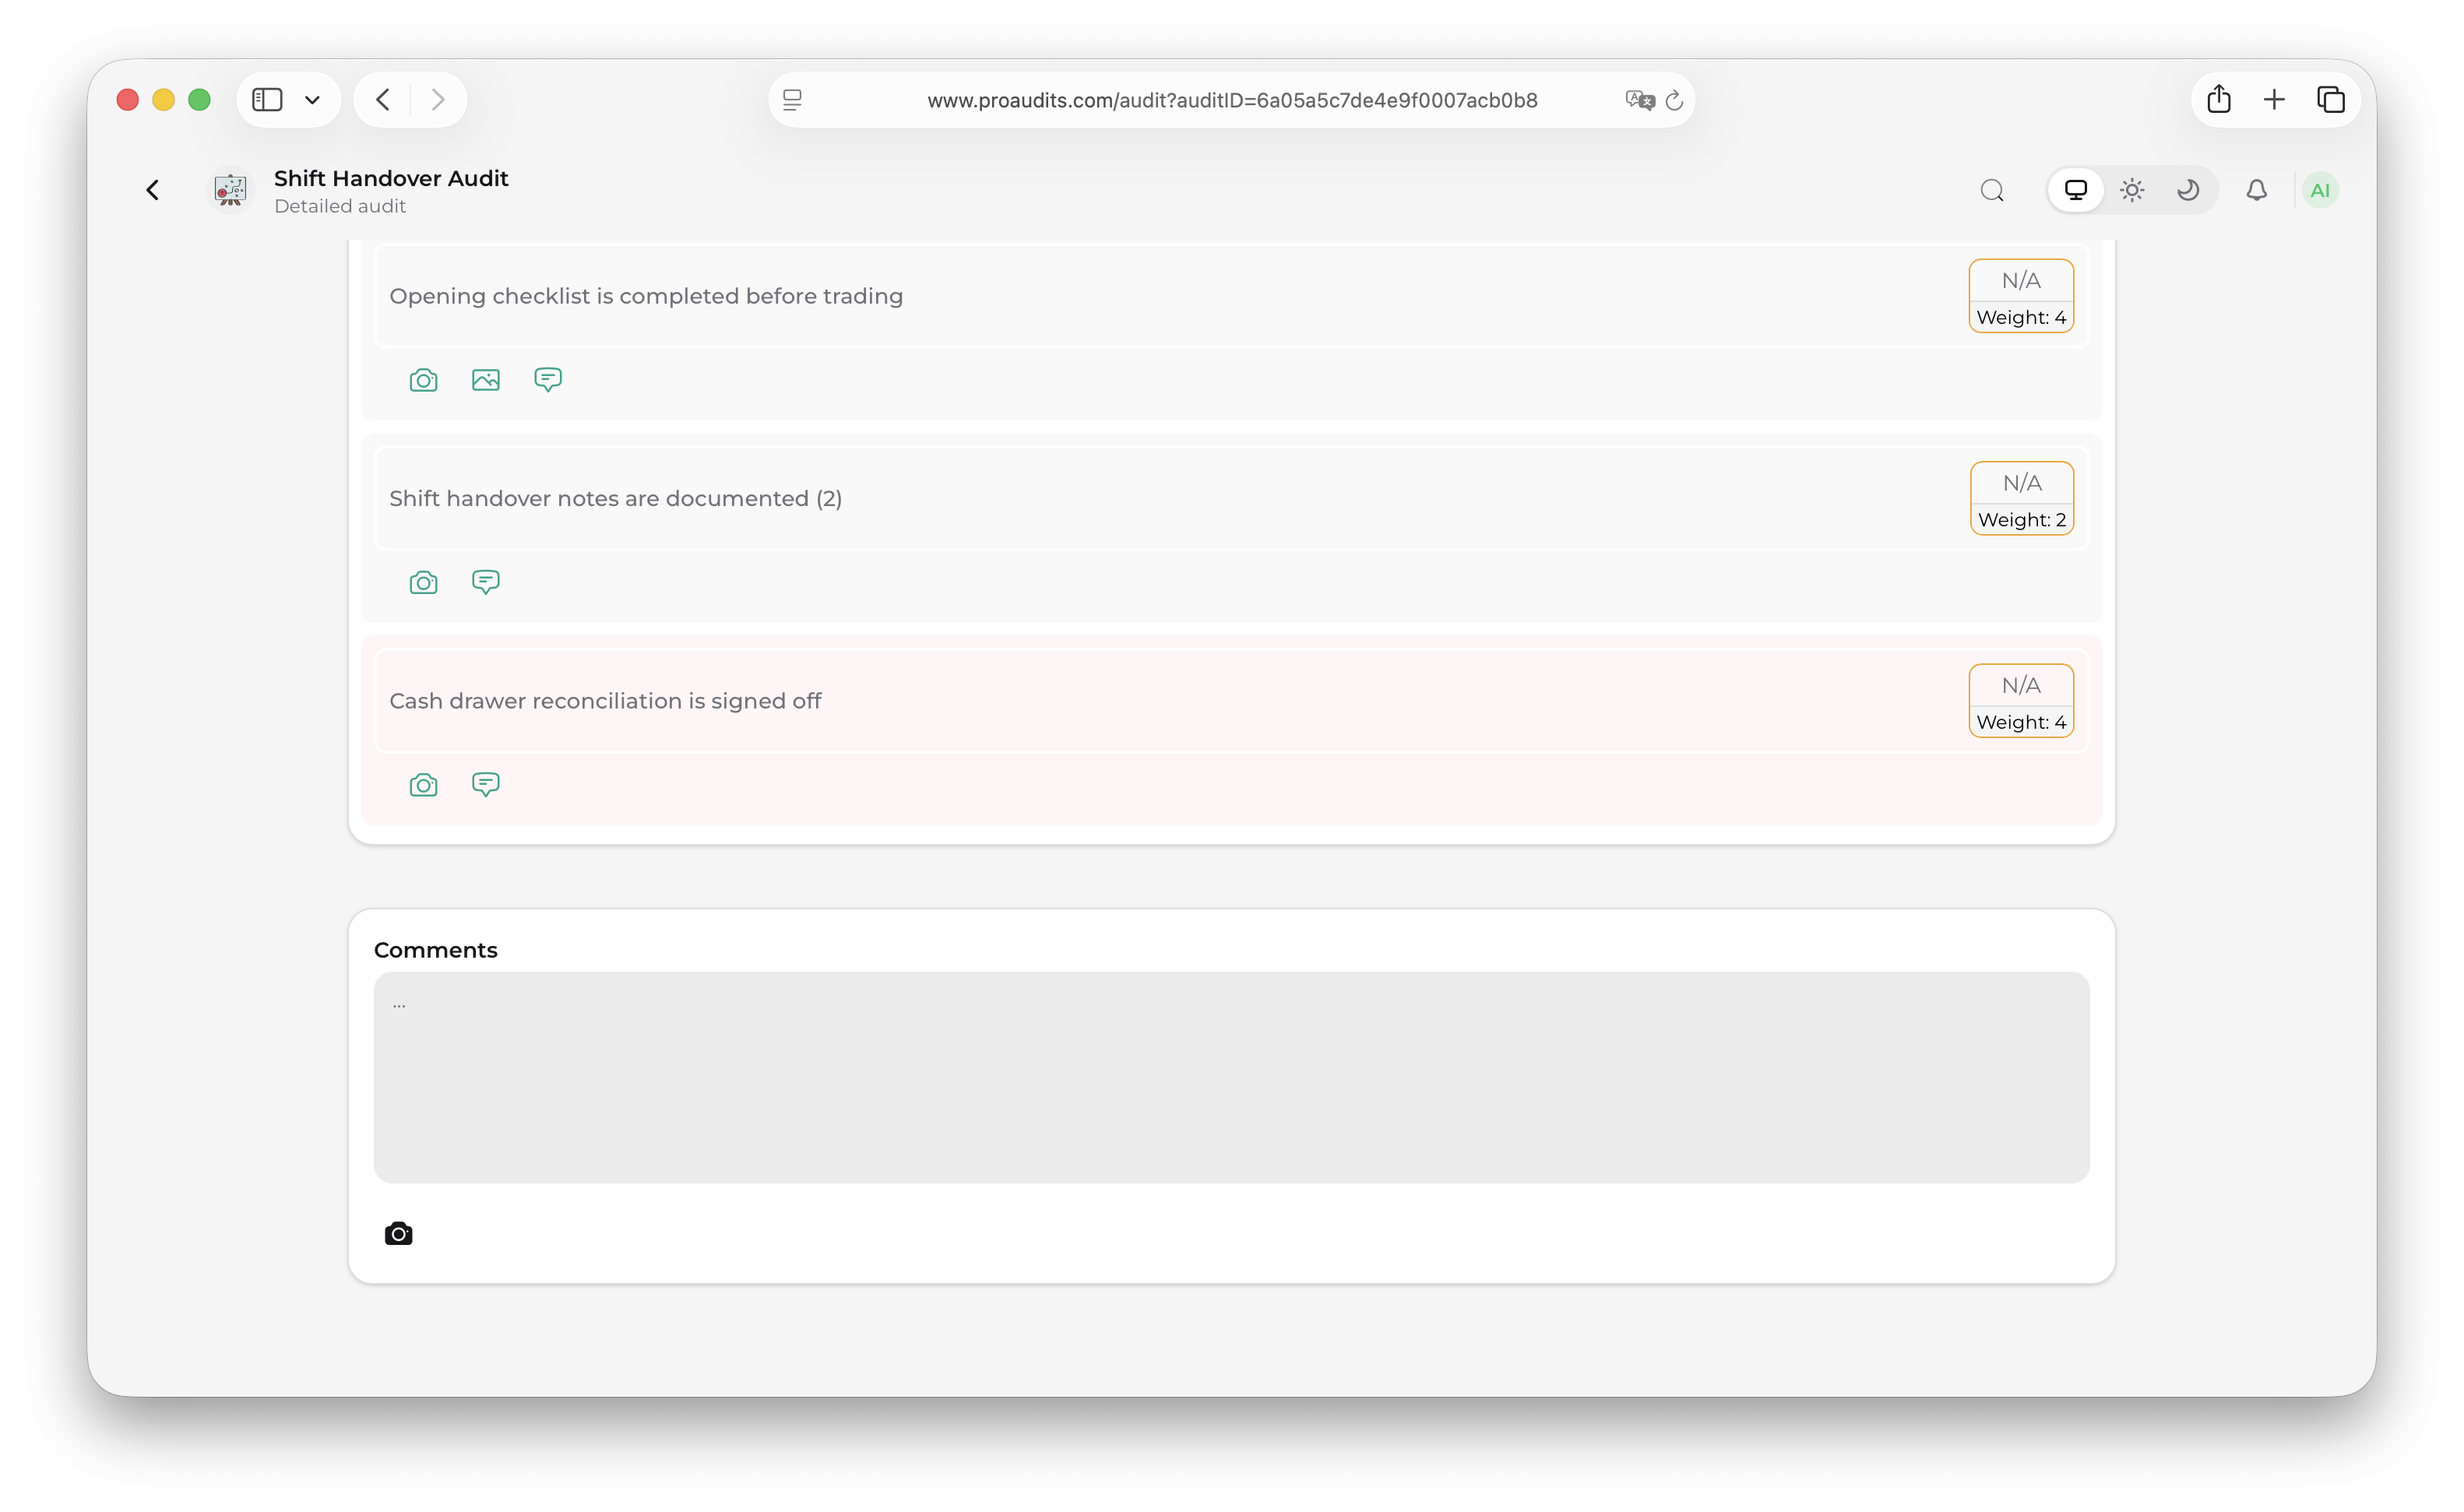
The body of the audit is a list of items grouped by sections. Each item is a single check the auditor has to make — for example, "Front door is clean", "Fridge temperature ≤ 4°C", "Staff badges are visible".
For each item you can:
- Pick a score (the green/yellow/red buttons, or whatever scale the template uses).
- Leave a comment for context.
- Attach photos as proof.
- Mark the item N/A if it doesn't apply.
A single audit item

Section headers
Each section has its own header showing how many items are inside and how many you have answered. It folds and unfolds with a click — handy when you want to skip ahead.
Section header
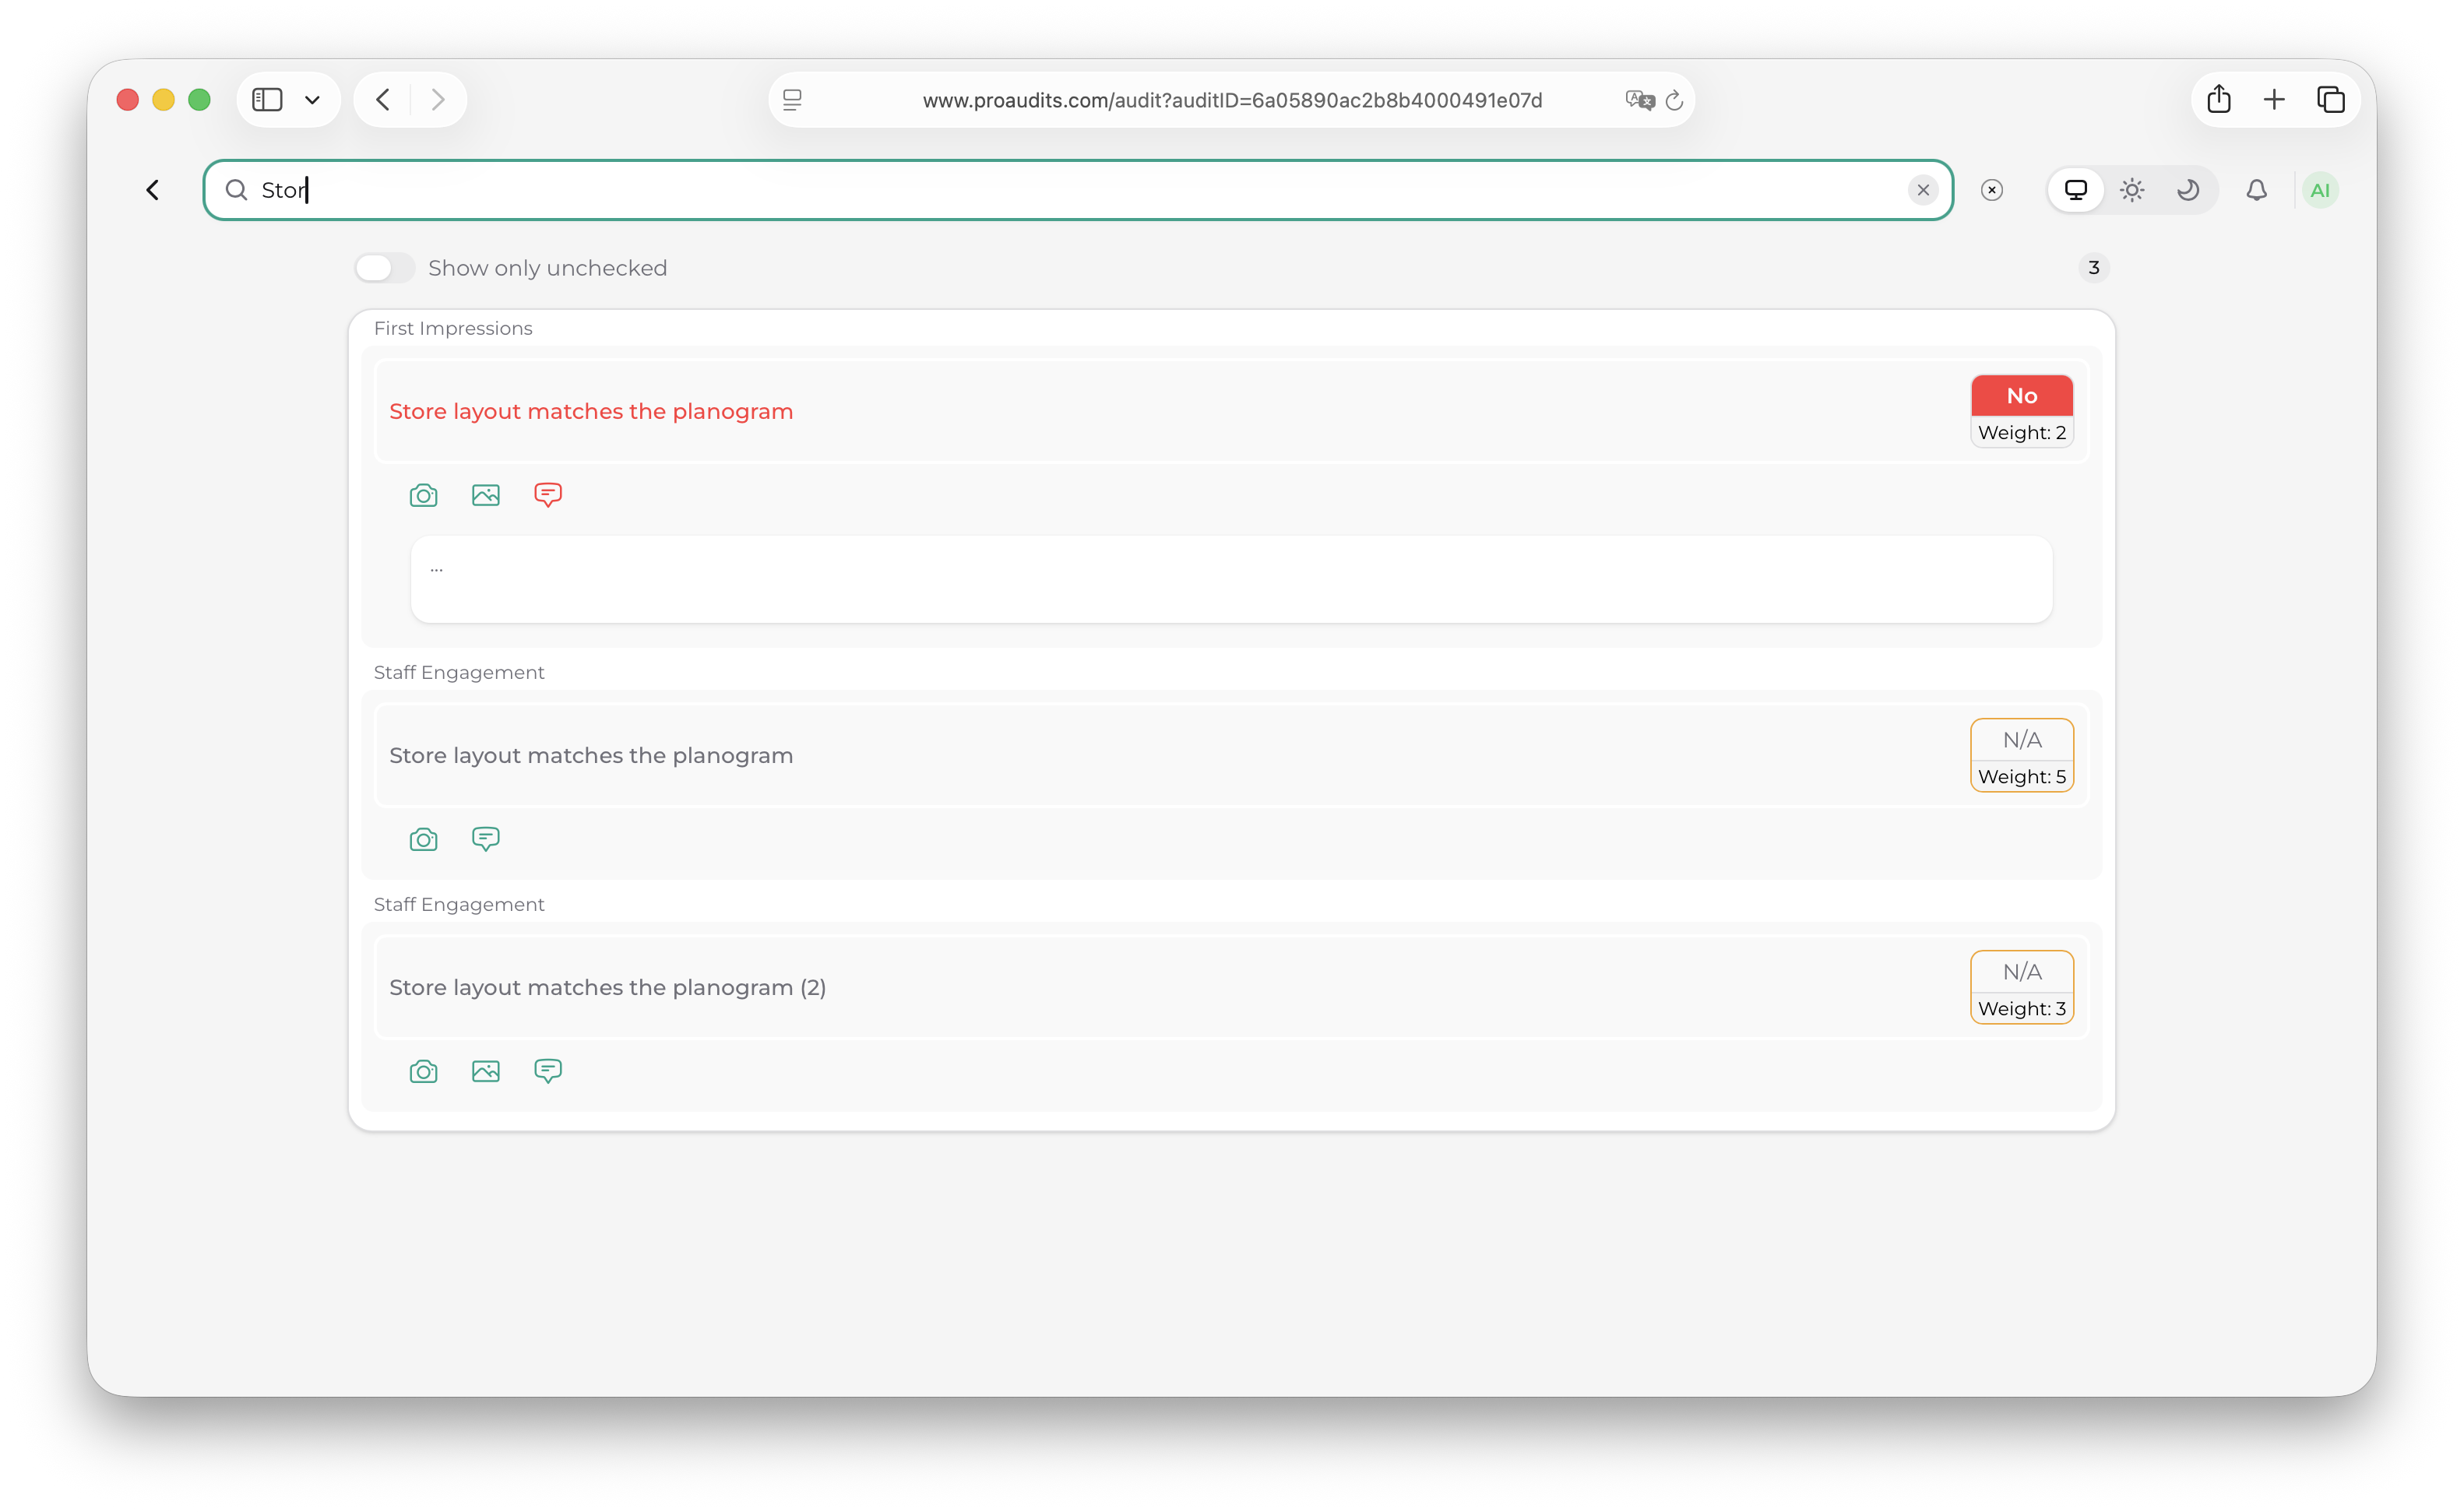
Searching within an audit
Big audits have lots of items. The search box just above the list lets you jump to a specific one by name. The list filters in real time as you type, and only matching sections stay open.
Audit search
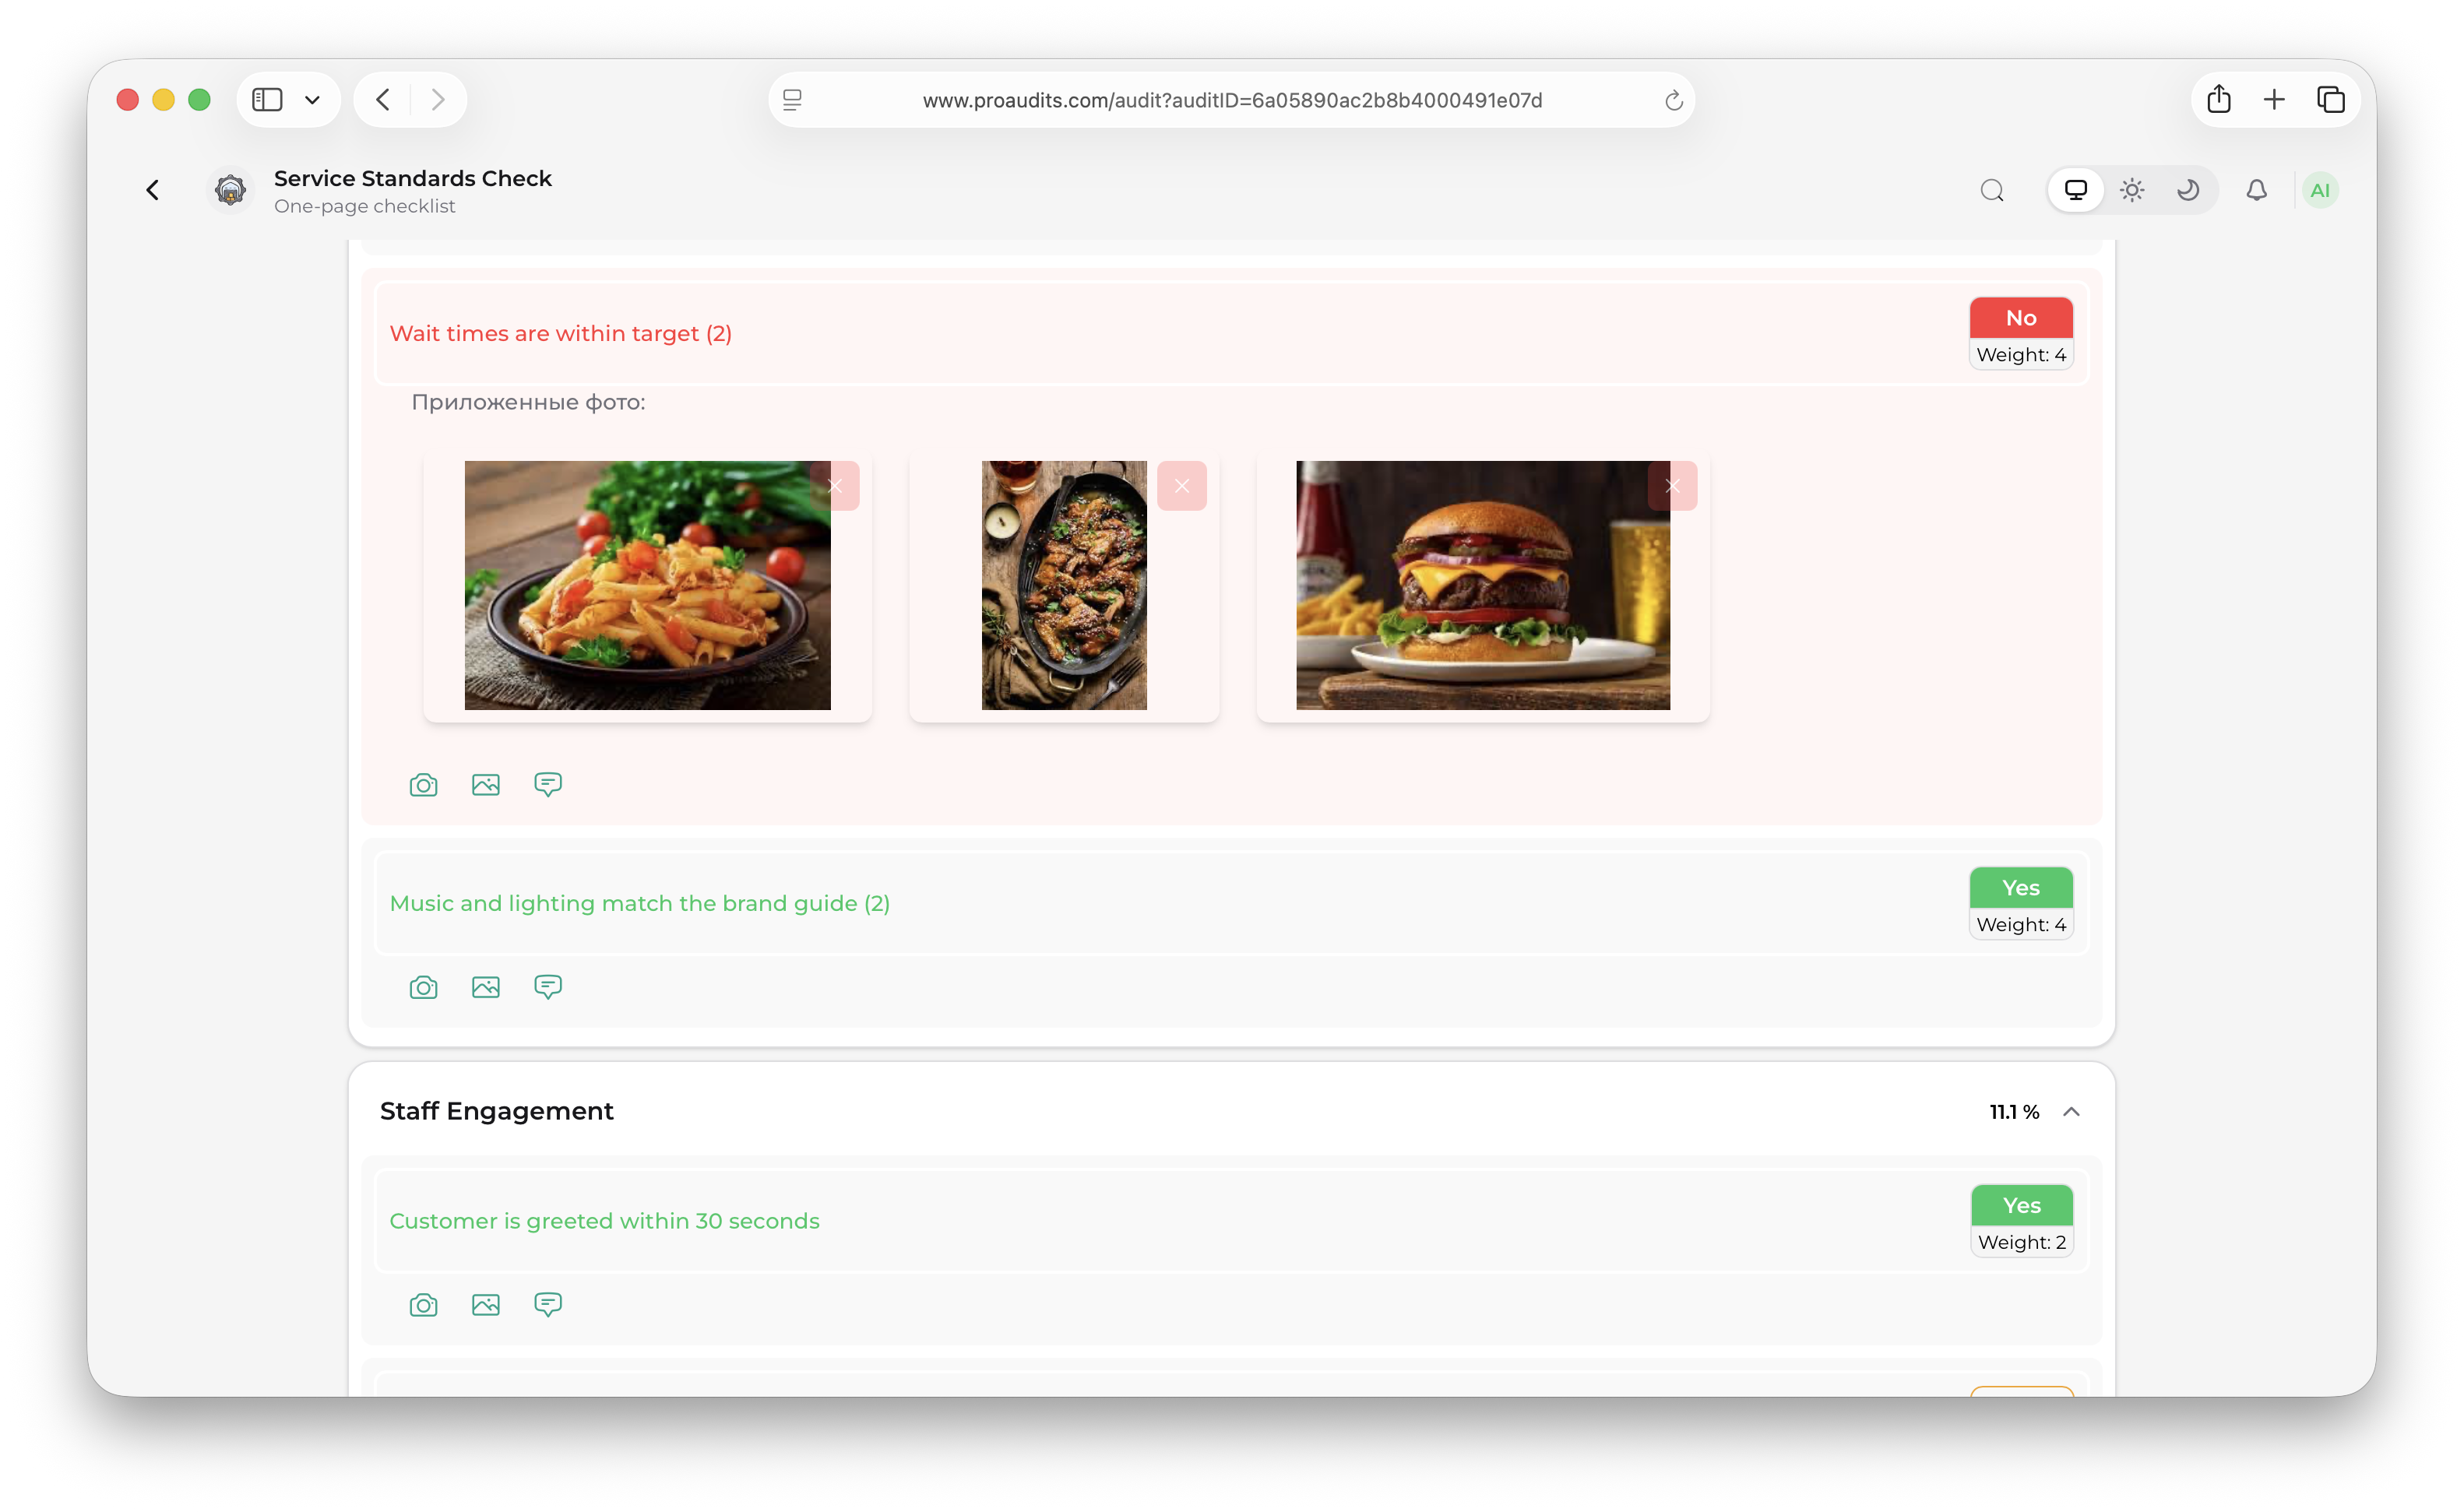
Attaching photos
Photos are how you prove what you saw. Click the camera icon on any item to attach one — from your camera roll on mobile, or by dragging a file in on desktop. You can attach as many as you need.
Photo upload on an item
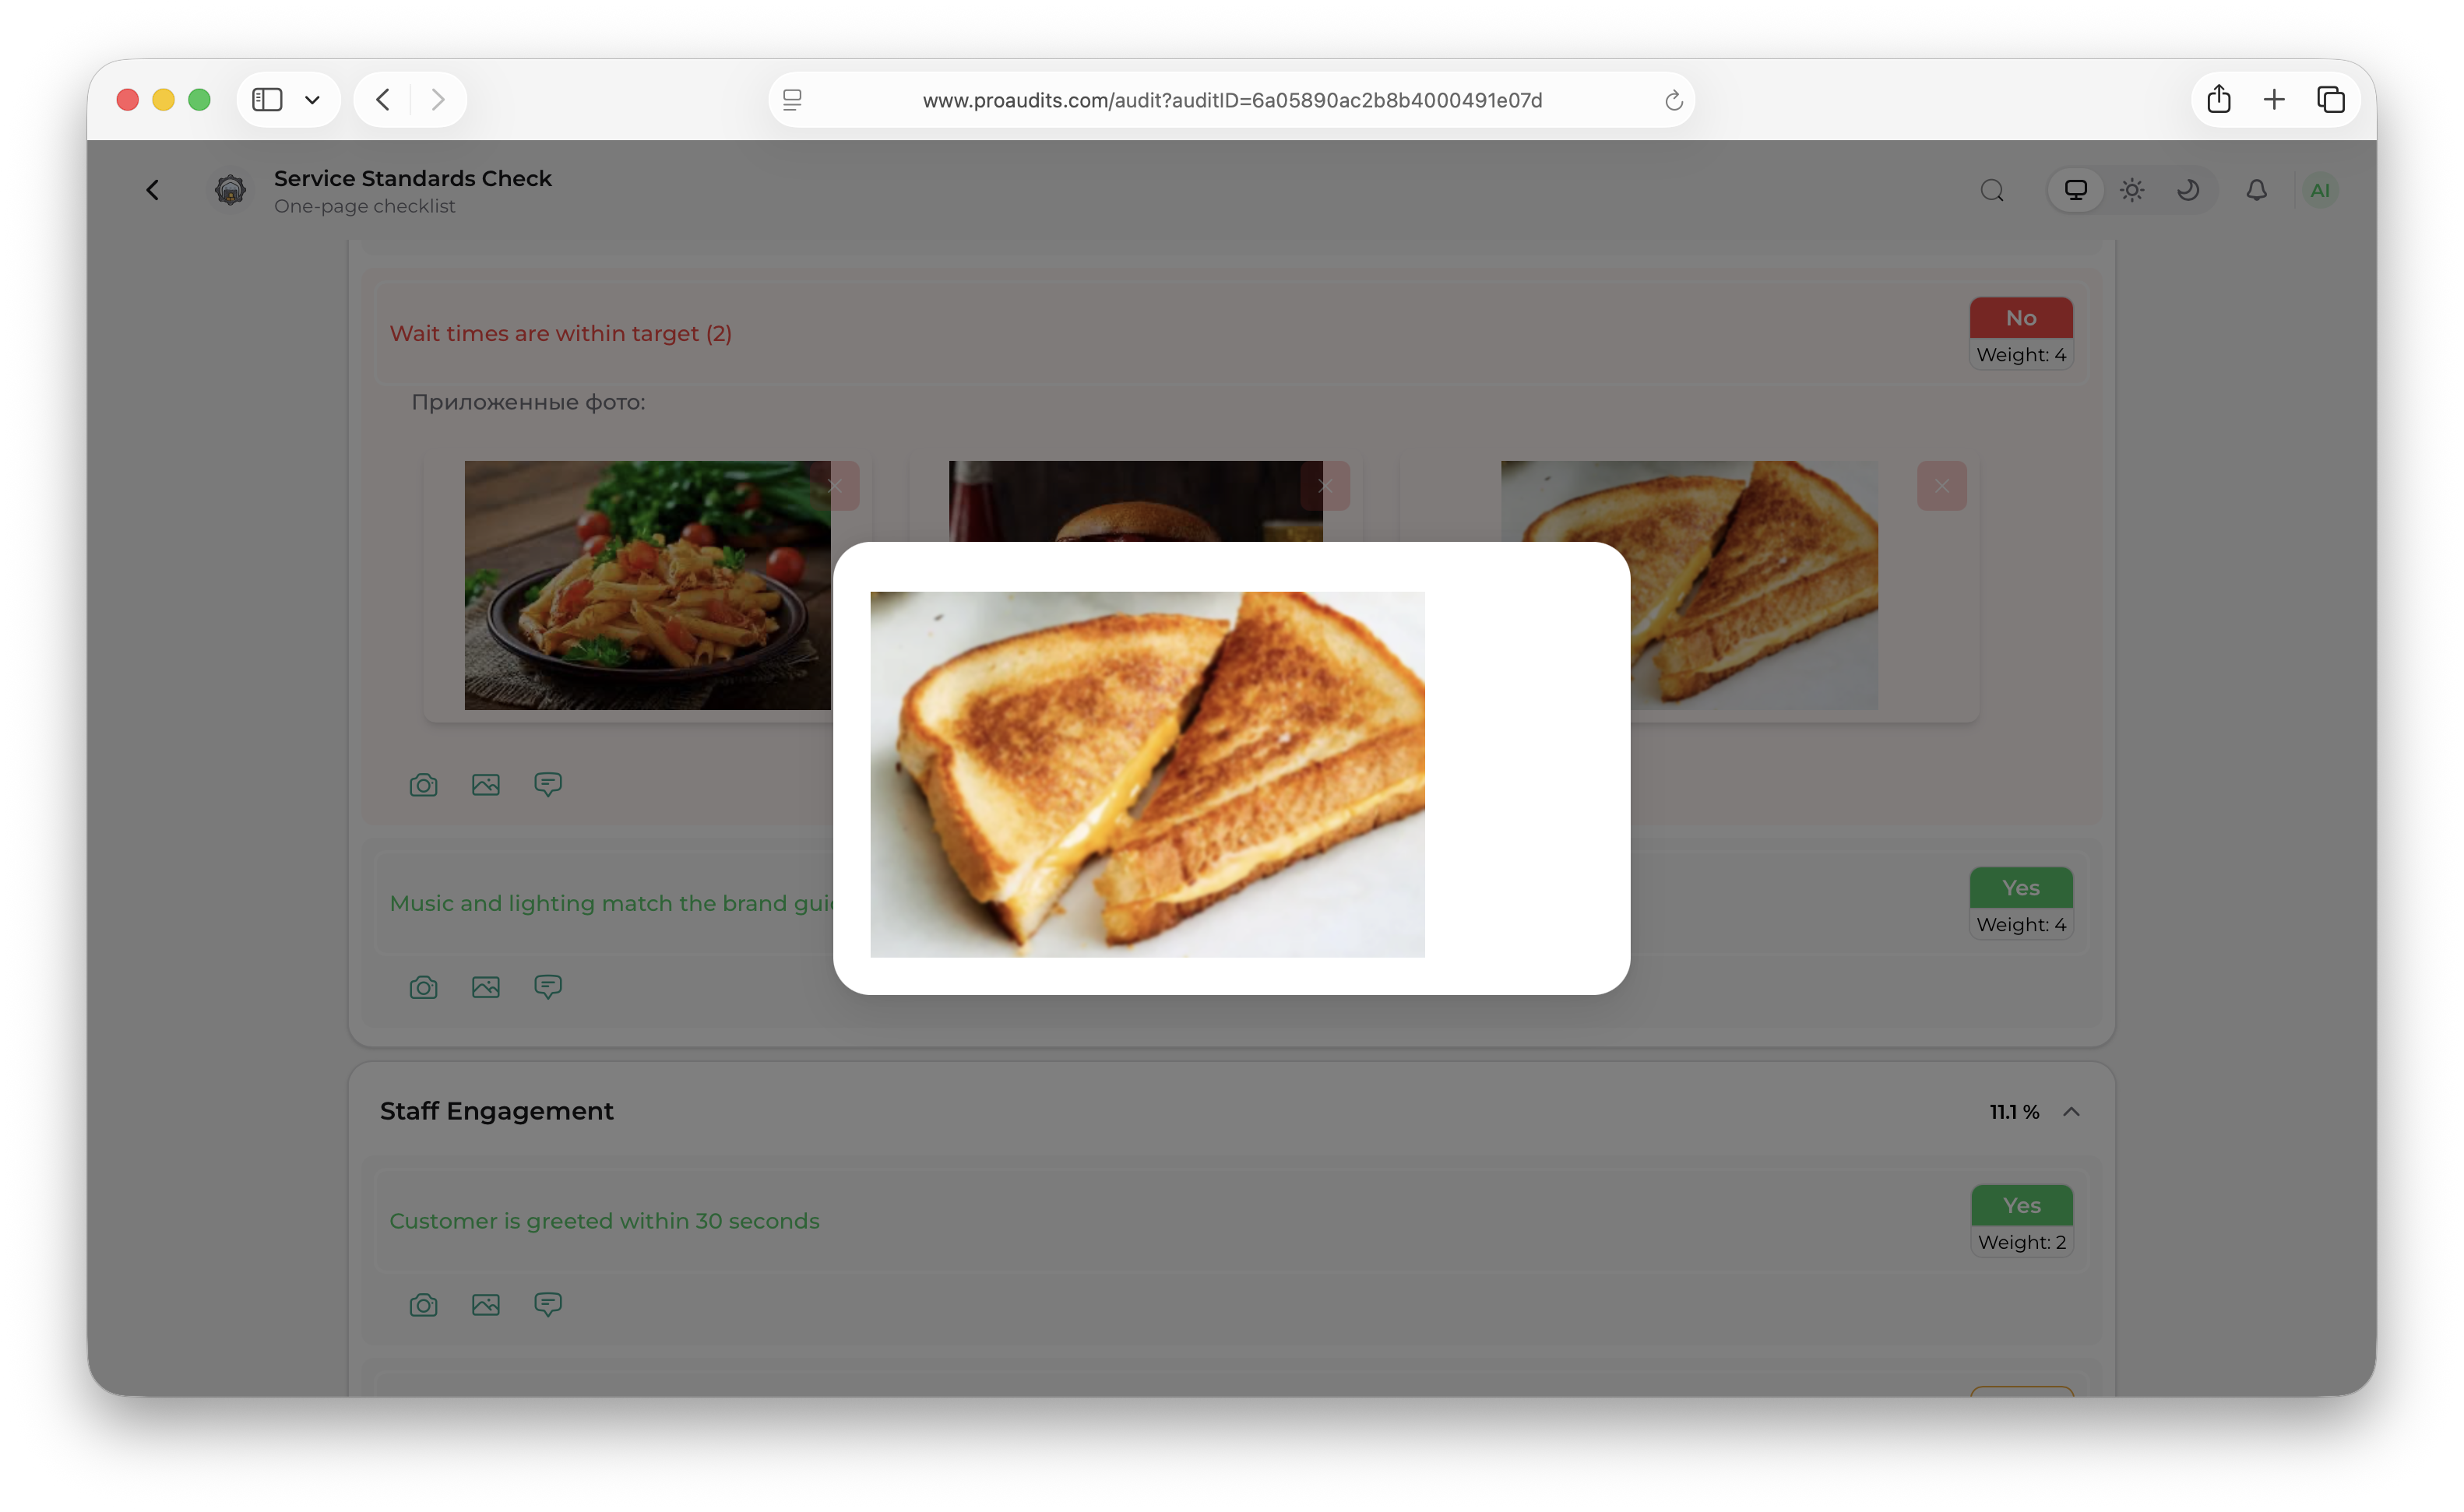
Zoom viewer
Clicking a photo opens the zoom viewer. Pinch, scroll, and arrow keys all work. The viewer has a small caption area where you can label the photo for later — useful when you upload several to the same item.
Photo zoom
Answering "No" — assigning responsibility
The moment you switch an item to No, ProAudits opens the responsibility controls on that row. This is the bridge between "I found a problem" and "someone will fix it" — and it is the only mechanism ProAudits uses to turn audit findings into Action plan cards.
A failed item with the responsibility list
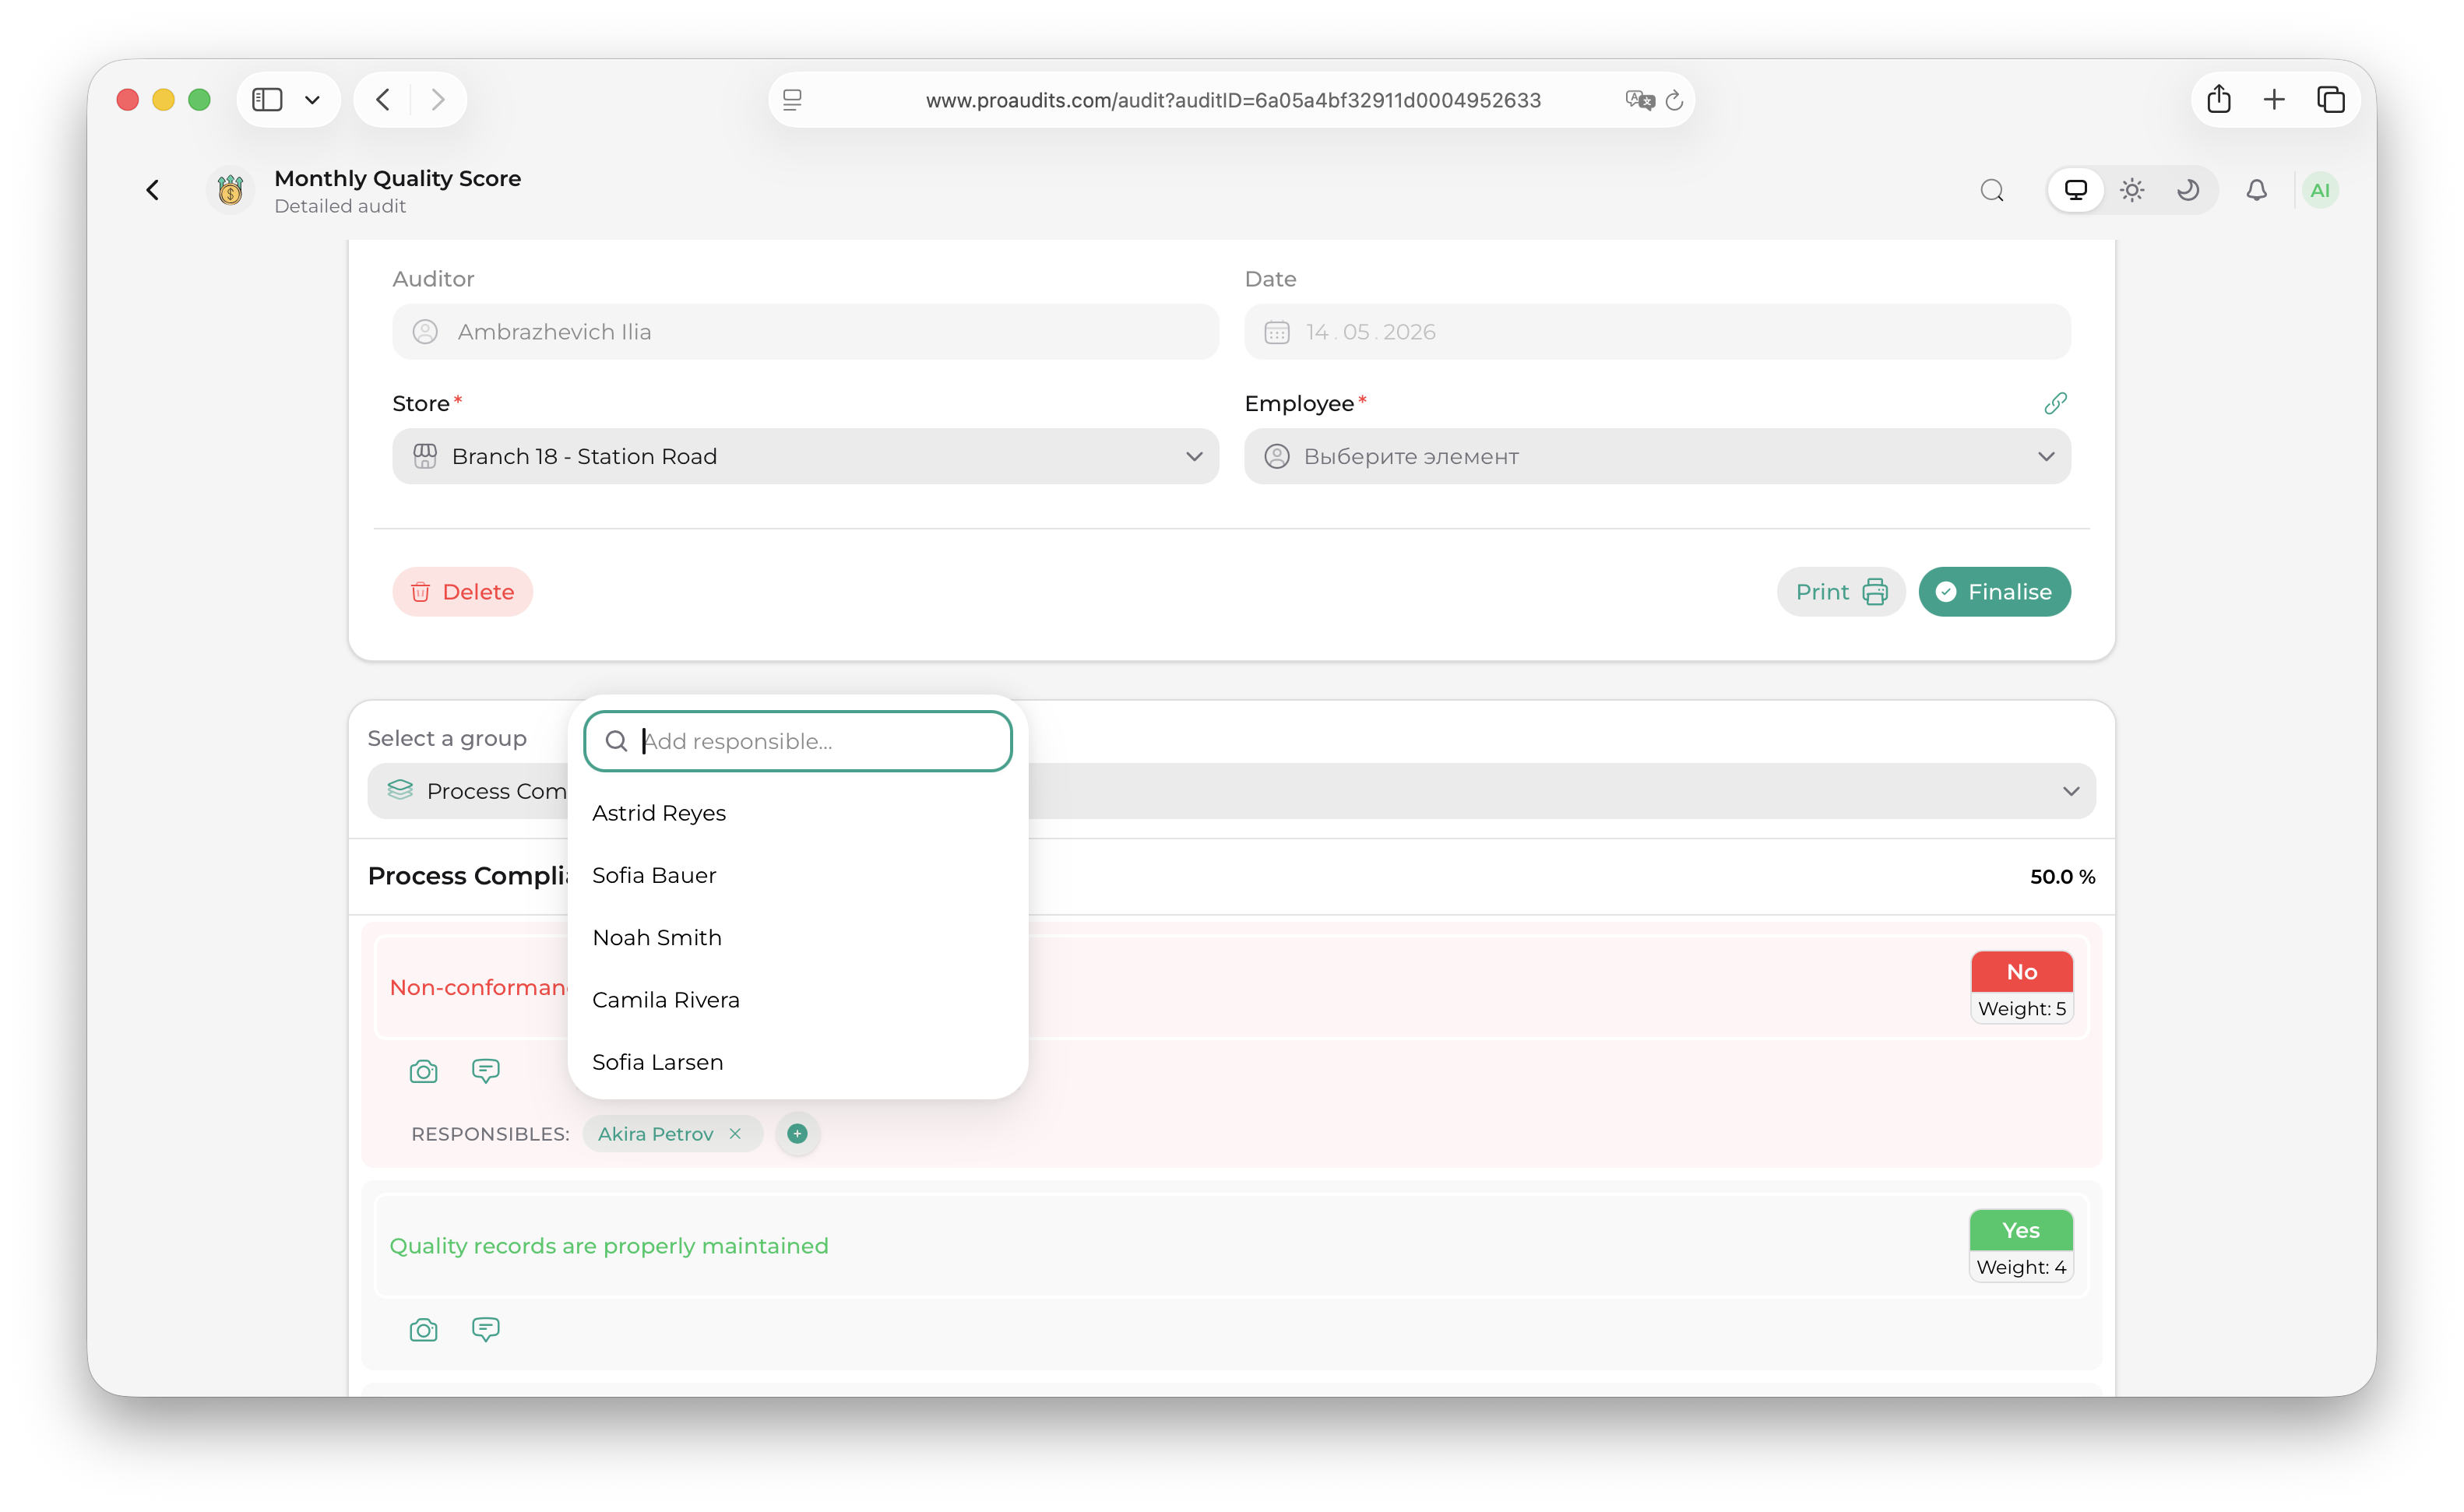
Auto-suggested responsibles
The template designer set a list of responsible roles on this item — usually one or two from the Shift manager / Store manager levels. The moment you mark the item No, ProAudits looks at the team roster for the store you are auditing and pre-fills the responsibility list with every employee whose role matches one of those template roles.
So if the item's roles are Shift manager — front of house and Store manager, and the store has three FOH shift managers and one store manager assigned, all four names land on the row automatically. You don't have to look them up.
If the template didn't set any roles for this item, no one is pre-filled and the row stays empty.
Editing the list manually
The auto-suggestion is a starting point — you have full control:
- Remove anyone by clicking the × on their chip. Useful when someone is on holiday or the issue clearly isn't theirs.
- Add anyone with the autocomplete below the chips. The autocomplete is not filtered by role — you can pick any member of the store team, including people the template wouldn't have suggested. Use this for cross-functional issues ("the maintenance lead needs to see this too").
You can assign as many people as you need to a single failed item. Each one becomes their own action card after the audit finishes — one item, one issue, but potentially several owners with several deadlines.
What happens if you leave the list empty
If a No-answer ends up with zero responsibles when you finish the audit, ProAudits records the finding but does not create an Action plan card for it. The item still counts against the score and still shows up in the audit history, but no owner is on the hook. Leaving the list empty is the right move when you want to flag something for area-manager review without yet pinning blame.
Adding general feedback
At the bottom of the audit there is a free-form Feedback section. Use it for things that don't fit any individual item — overall impressions, recurring themes, or notes for the area manager.
Feedback area
Finishing the audit
When every required item is answered, the Ready to finish button at the bottom right turns green. Click it and ProAudits opens a final checklist that confirms nothing important is missing.
Ready-to-finish modal
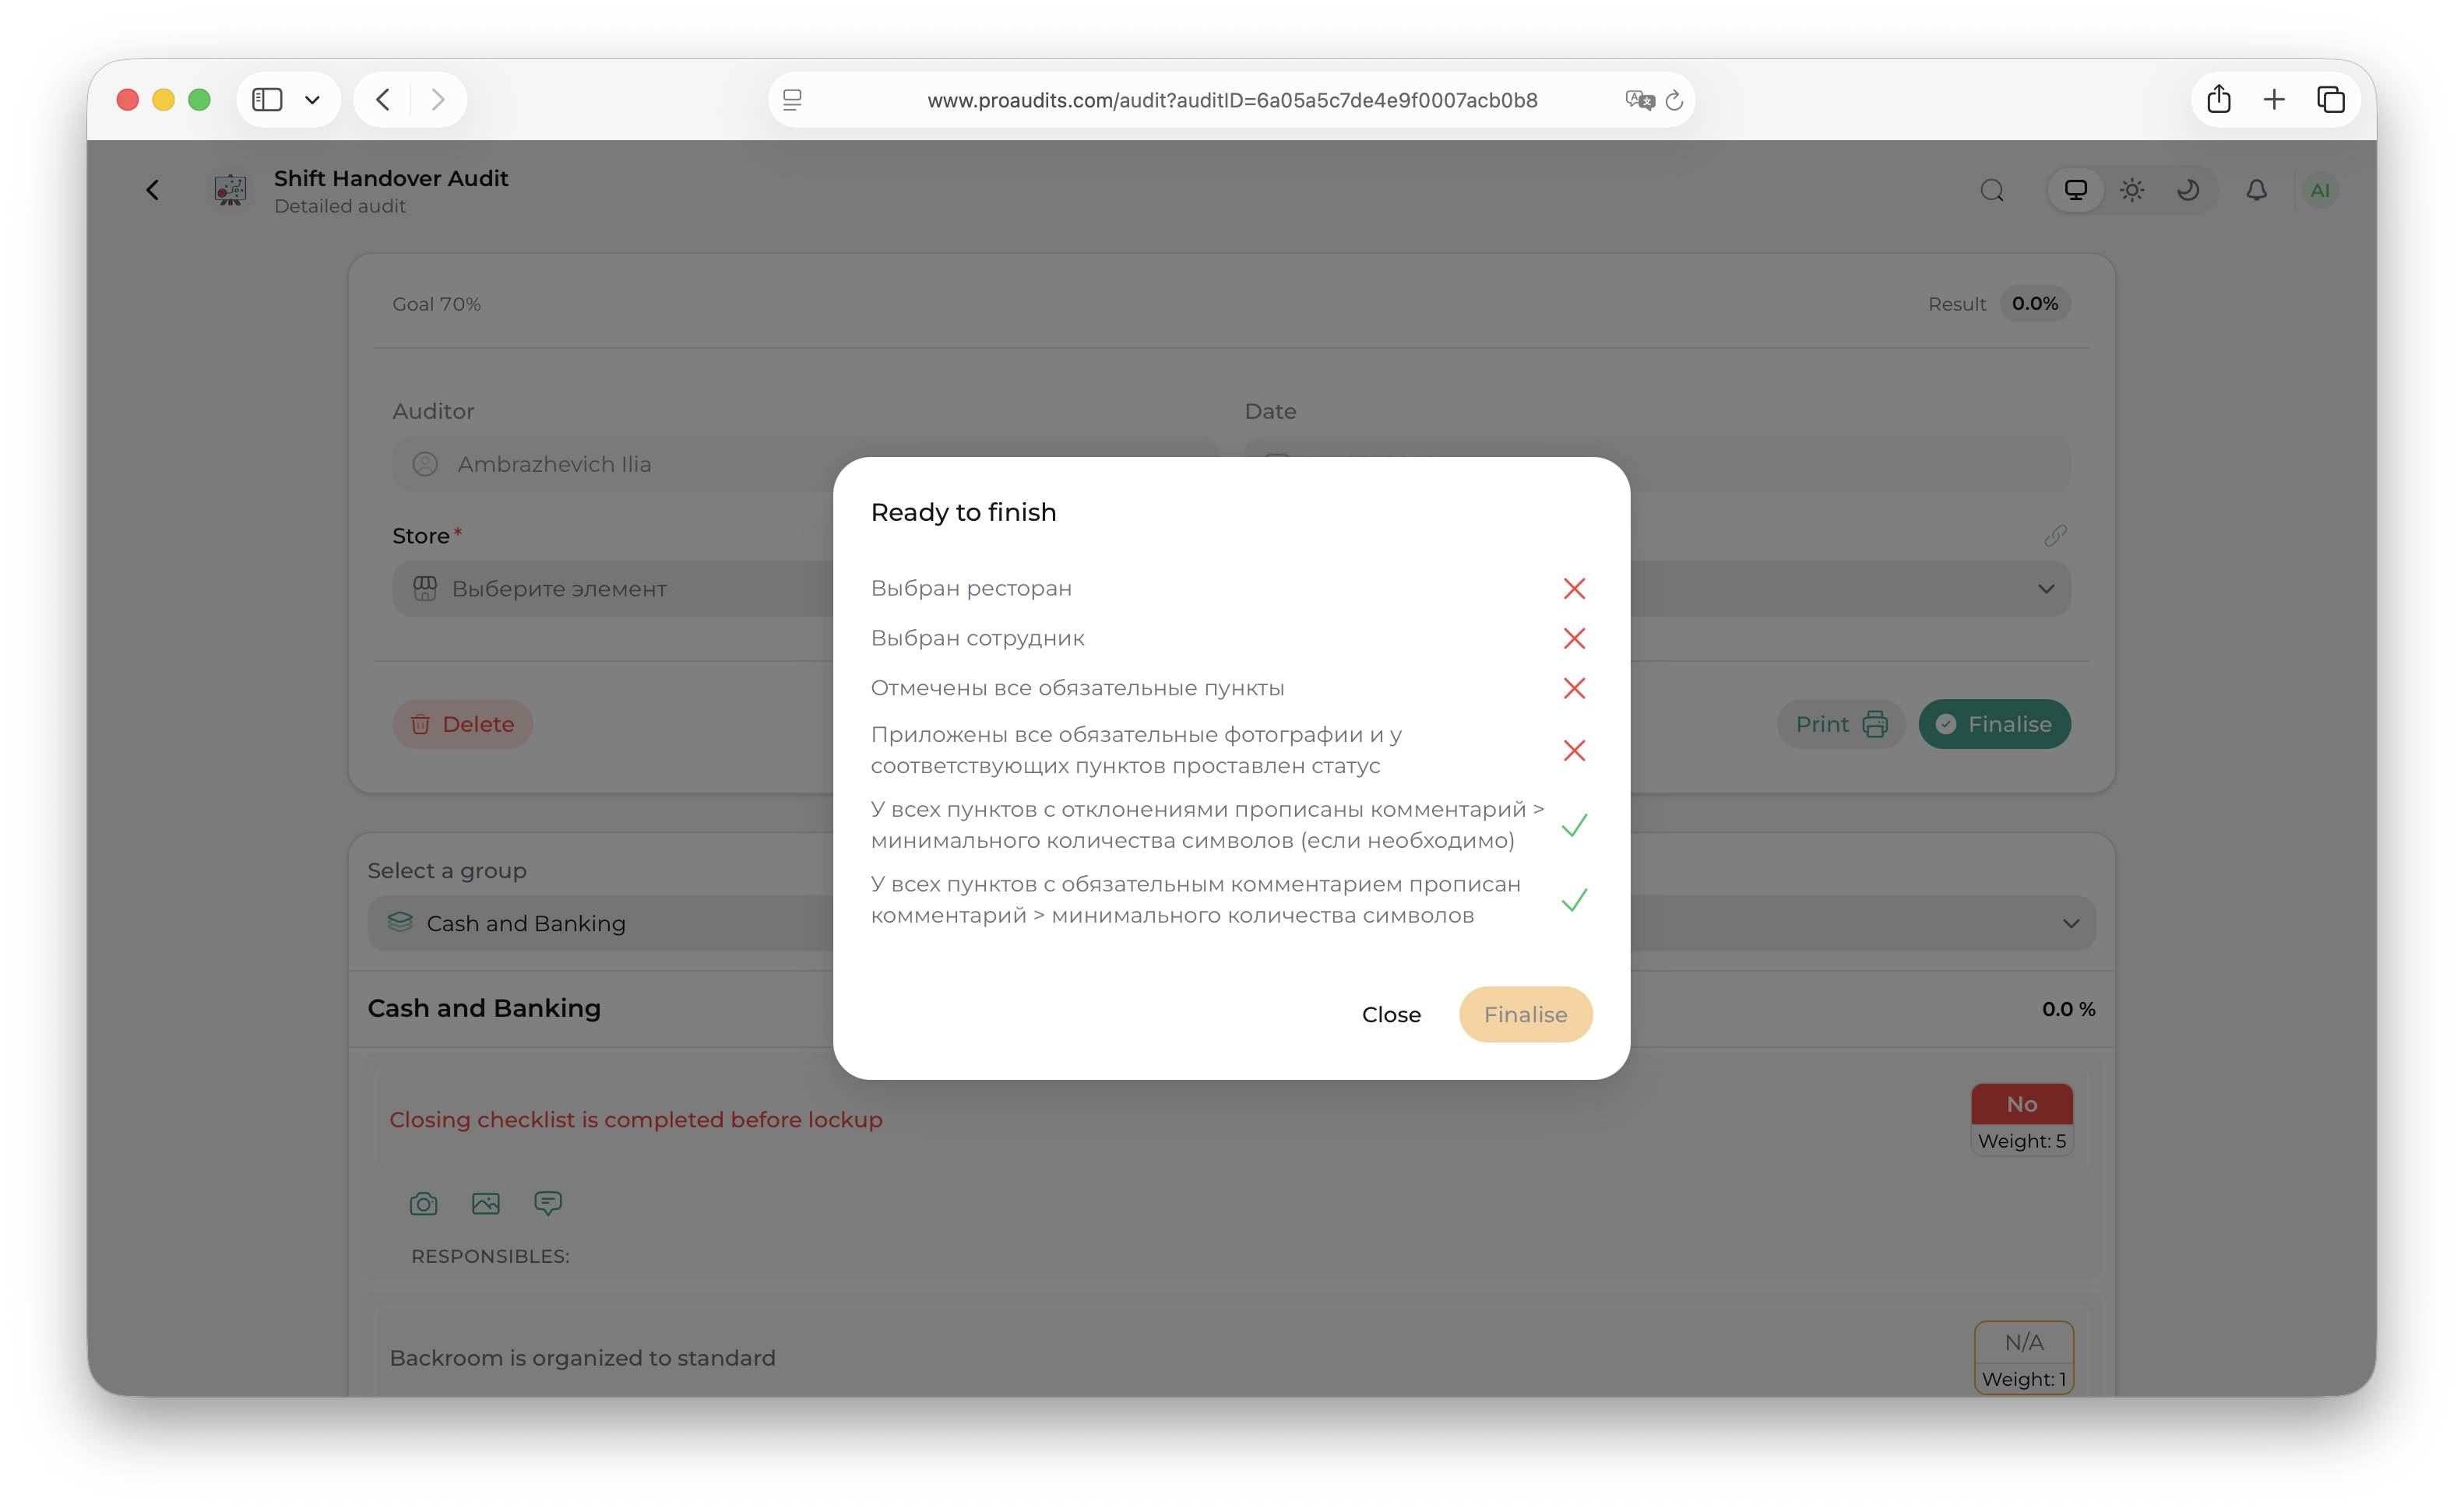
The modal lists the rules that must be true before submission — usually things like:
- Every required item has a score.
- Photos are attached where the template asks for them.
- The feedback section is filled in.
You can finish anyway in some cases, with a warning; in others (when an item is truly required) the modal asks you to fill it in first.
After you finish
Once you submit, the audit is locked and becomes part of the records:
- It appears in the Audits history on the dashboard.
- Every "No" item that has at least one responsible employee assigned automatically creates a locked action card on the Action plan — one card per assigned employee. The audit's comment becomes the action text, and the deadline is set to today + the item's days to respond (or +7 days if the template designer didn't specify one).
- The area manager and every newly responsible employee get a notification.
Lost connection mid-audit? No problem
ProAudits saves as you go. If the internet drops, your work stays on the device and re-syncs the moment you are back online. You will never lose progress.
Exporting an audit
From the audit header, two buttons let you take the audit out of the system:
- Print PDF — generates a one-page summary with all answers, comments, and photos.
- Export to Excel — produces a flat row of the audit you can drop into a spreadsheet for further analysis.
Both are also available on completed audits in the Audits history on the dashboard.