Administration
Roles
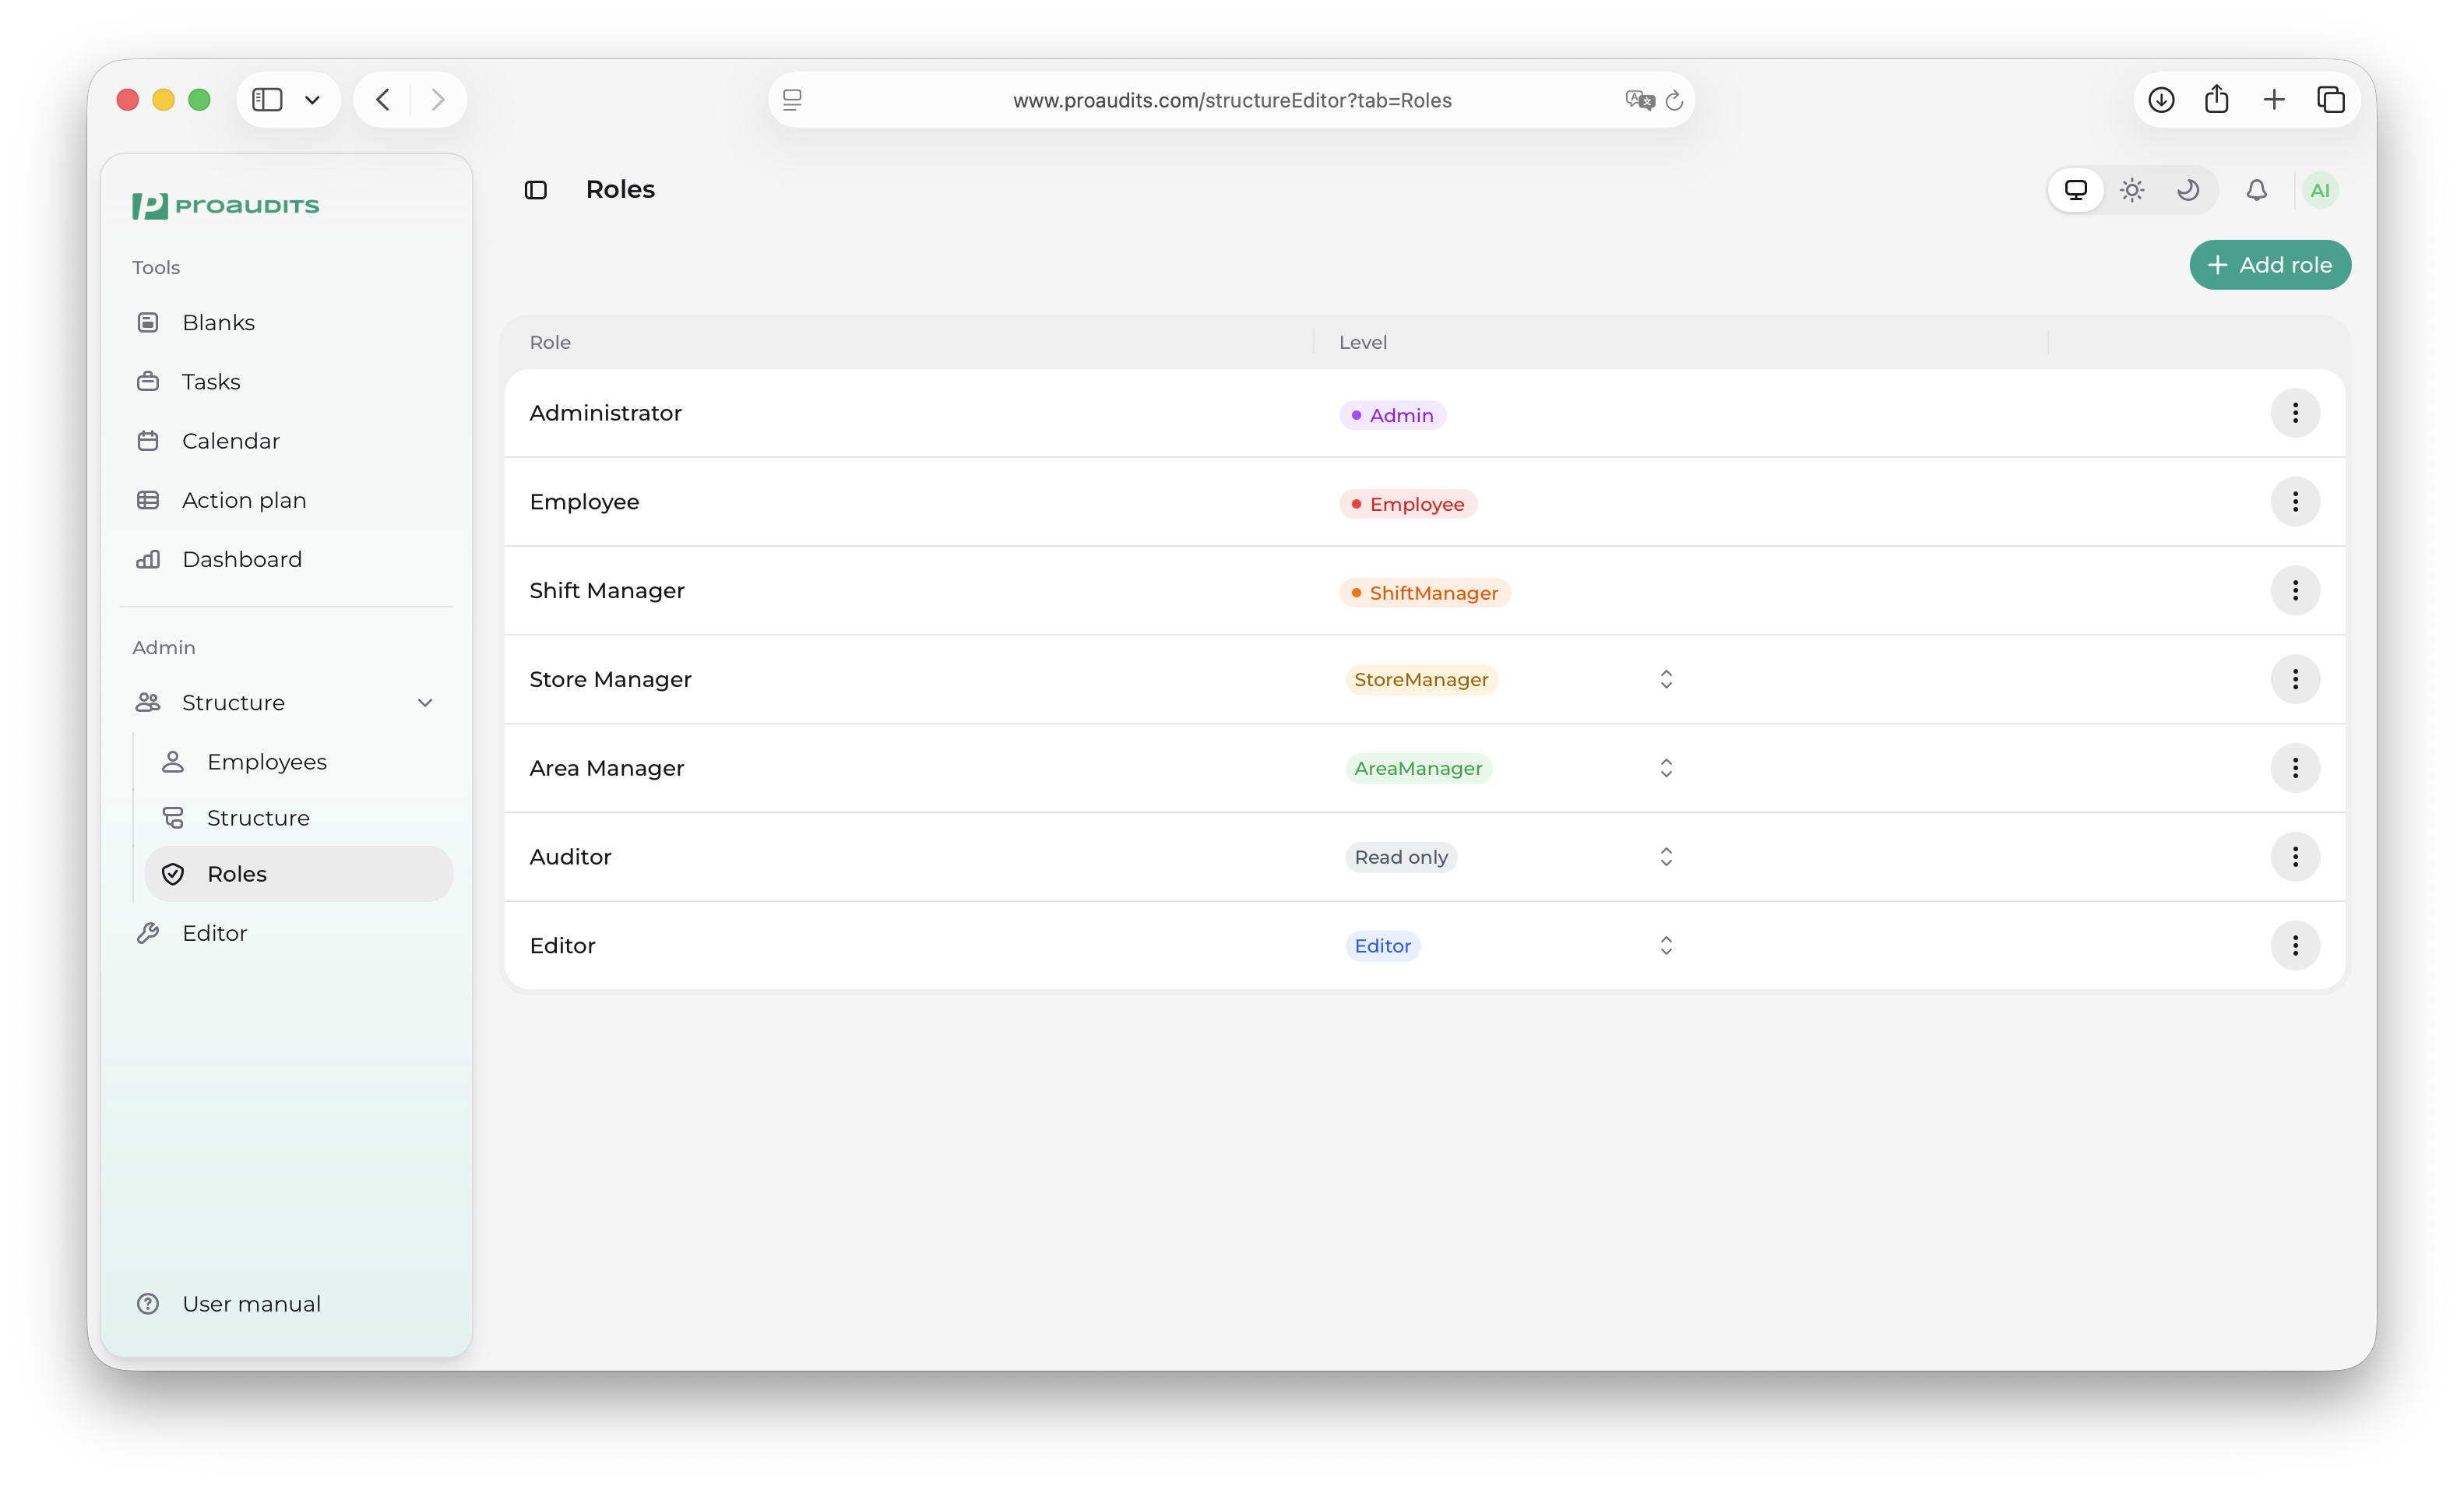
The Roles tab inside the Structure editor is where you define who can do what in ProAudits. It is small — three columns, an "Add role" button, and a job-titles modal — but it is the engine that decides every menu item, every button, and every read/write right in the rest of the app.
Roles tab
The mental model
There are three building blocks. They are deliberately simple:
- Level — a fixed set of permission tiers built into ProAudits. You cannot add new levels, rename them, or change what each one allows. There are seven.
- Role — a named bundle on top of a level. You can create as many roles as you like. A role is just a name + the level it is tied to.
- Job title — a free-text string that an external HR system (via the integration API) may use to describe an employee's position. Each job title can be mapped to one role, so when a new employee arrives from the HR feed with that exact title, ProAudits automatically assigns them the right role.
That's it. There are no checkboxes for per-page permissions, no custom permission sets — just name + level + (optional) job titles that auto-route to this role.
The seven fixed levels
These are baked into the product. Their names and what each one unlocks cannot be changed:
| Level | Who it's for |
|---|---|
| Employee | Front-line staff. The baseline — they can receive tasks, reply to feedback, but cannot run audits or see dashboards. |
| Shift manager | Floor supervisors. Can run audits assigned to them and pick up findings on the action plan. |
| Store manager | Manages a single location. Sees that location's dashboard and action plan. |
| Area manager | Manages many locations. Cross-location dashboard and action plan, can approve action plan cards. |
| Read-only | Stakeholders who need to look but not touch — view-only dashboards and reports. |
| Editor | Designs blanks. Has access to the Editor. |
| Admin | Full administrative access — structure, roles, settings, everything. |
The level is what ProAudits checks when it decides whether a menu item appears in your sidebar, whether you can press a button, whether you can see a dashboard widget. Custom roles inherit those checks from their level — nothing more, nothing less.
The roles table
The catalogue is a simple grid with three meaningful columns:
Column 1 — Role name
A free-form text field. Click the pencil icon that appears on hover, type the new name, then Save (or press Enter). Cancel (or Esc) discards.
A few notes:
- Names do not have to be unique across the system, but they should be — auditors and area managers see only the name in dropdowns.
- Names are the only thing always editable. Even protected roles (see below) can be renamed.
- Russian and English names work side by side; ProAudits stores whatever you type.
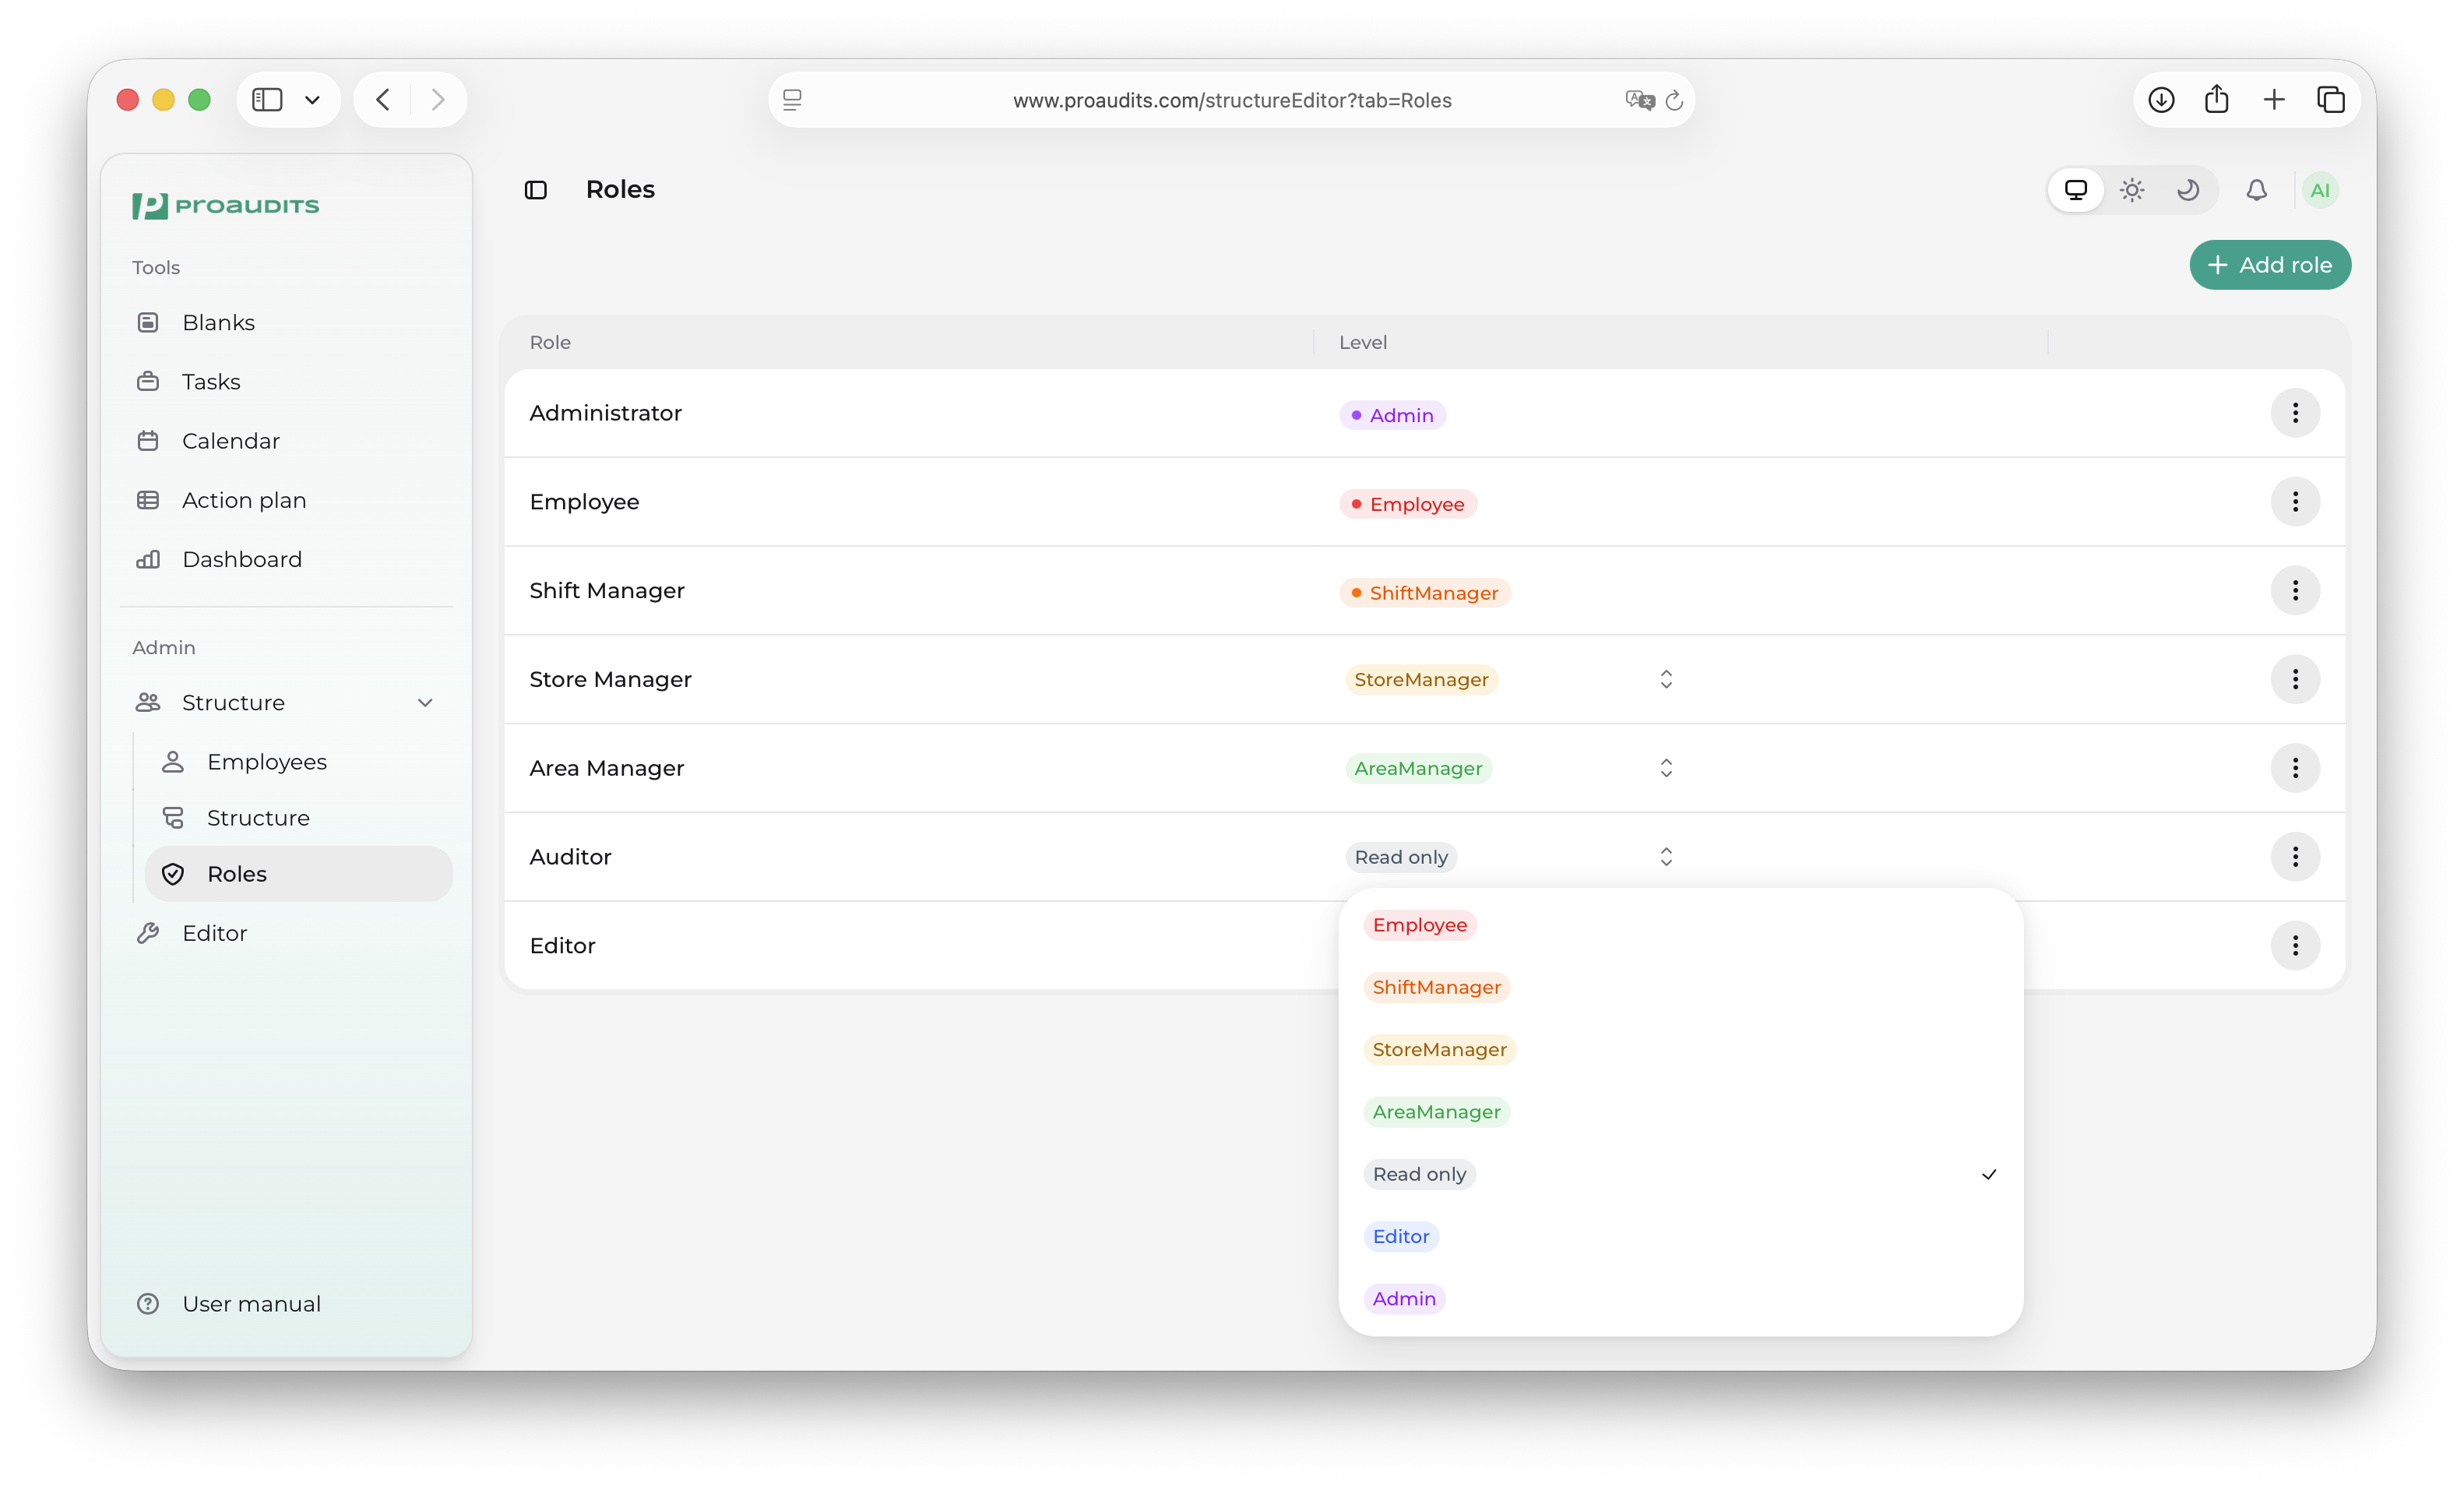
Column 2 — Level
A chip showing the role's current level, color-coded:
- For protected roles (the first four default roles seeded by ProAudits — Employee, Shift manager, Store manager, Area manager): the chip is read-only. You cannot change the level.
- For every other role: the chip is a drop-down. Click it and pick from the seven levels. The change saves the moment you pick.
Level dropdown
Column 3 — Actions menu
The three-dot menu at the end of the row offers two actions:
- Job Titles — opens the job-titles map modal for this role (see next section).
- Delete — removes the role. Disabled (greyed out) for the four protected roles.
When you delete a custom role, every employee currently on that role is moved back to the base Employee level until you reassign them.
Add a role
The Add Role button at the top of the table creates a new role on the spot, with a placeholder name like "New role" and the Shift manager level by default. The new row is immediately editable — rename it and pick the level you actually want.
There is no separate modal — adding a role is one click + an inline rename. Roles are cheap to create; make as many as you need.
Why two layers (level + name)?
Because levels are about permissions and names are about language. You want one Auditor role for front-of-house, another Auditor role for kitchen, another for stockroom — they are different jobs, but they share the same permissions (Shift manager level). With this model:
- Permissions stay tight and consistent (the level is the single source of truth).
- Names match your business vocabulary, your HR system's job-title list, and the language your team actually speaks.
A typical setup ends up with 6–15 named roles, each pinned to one of the seven levels.
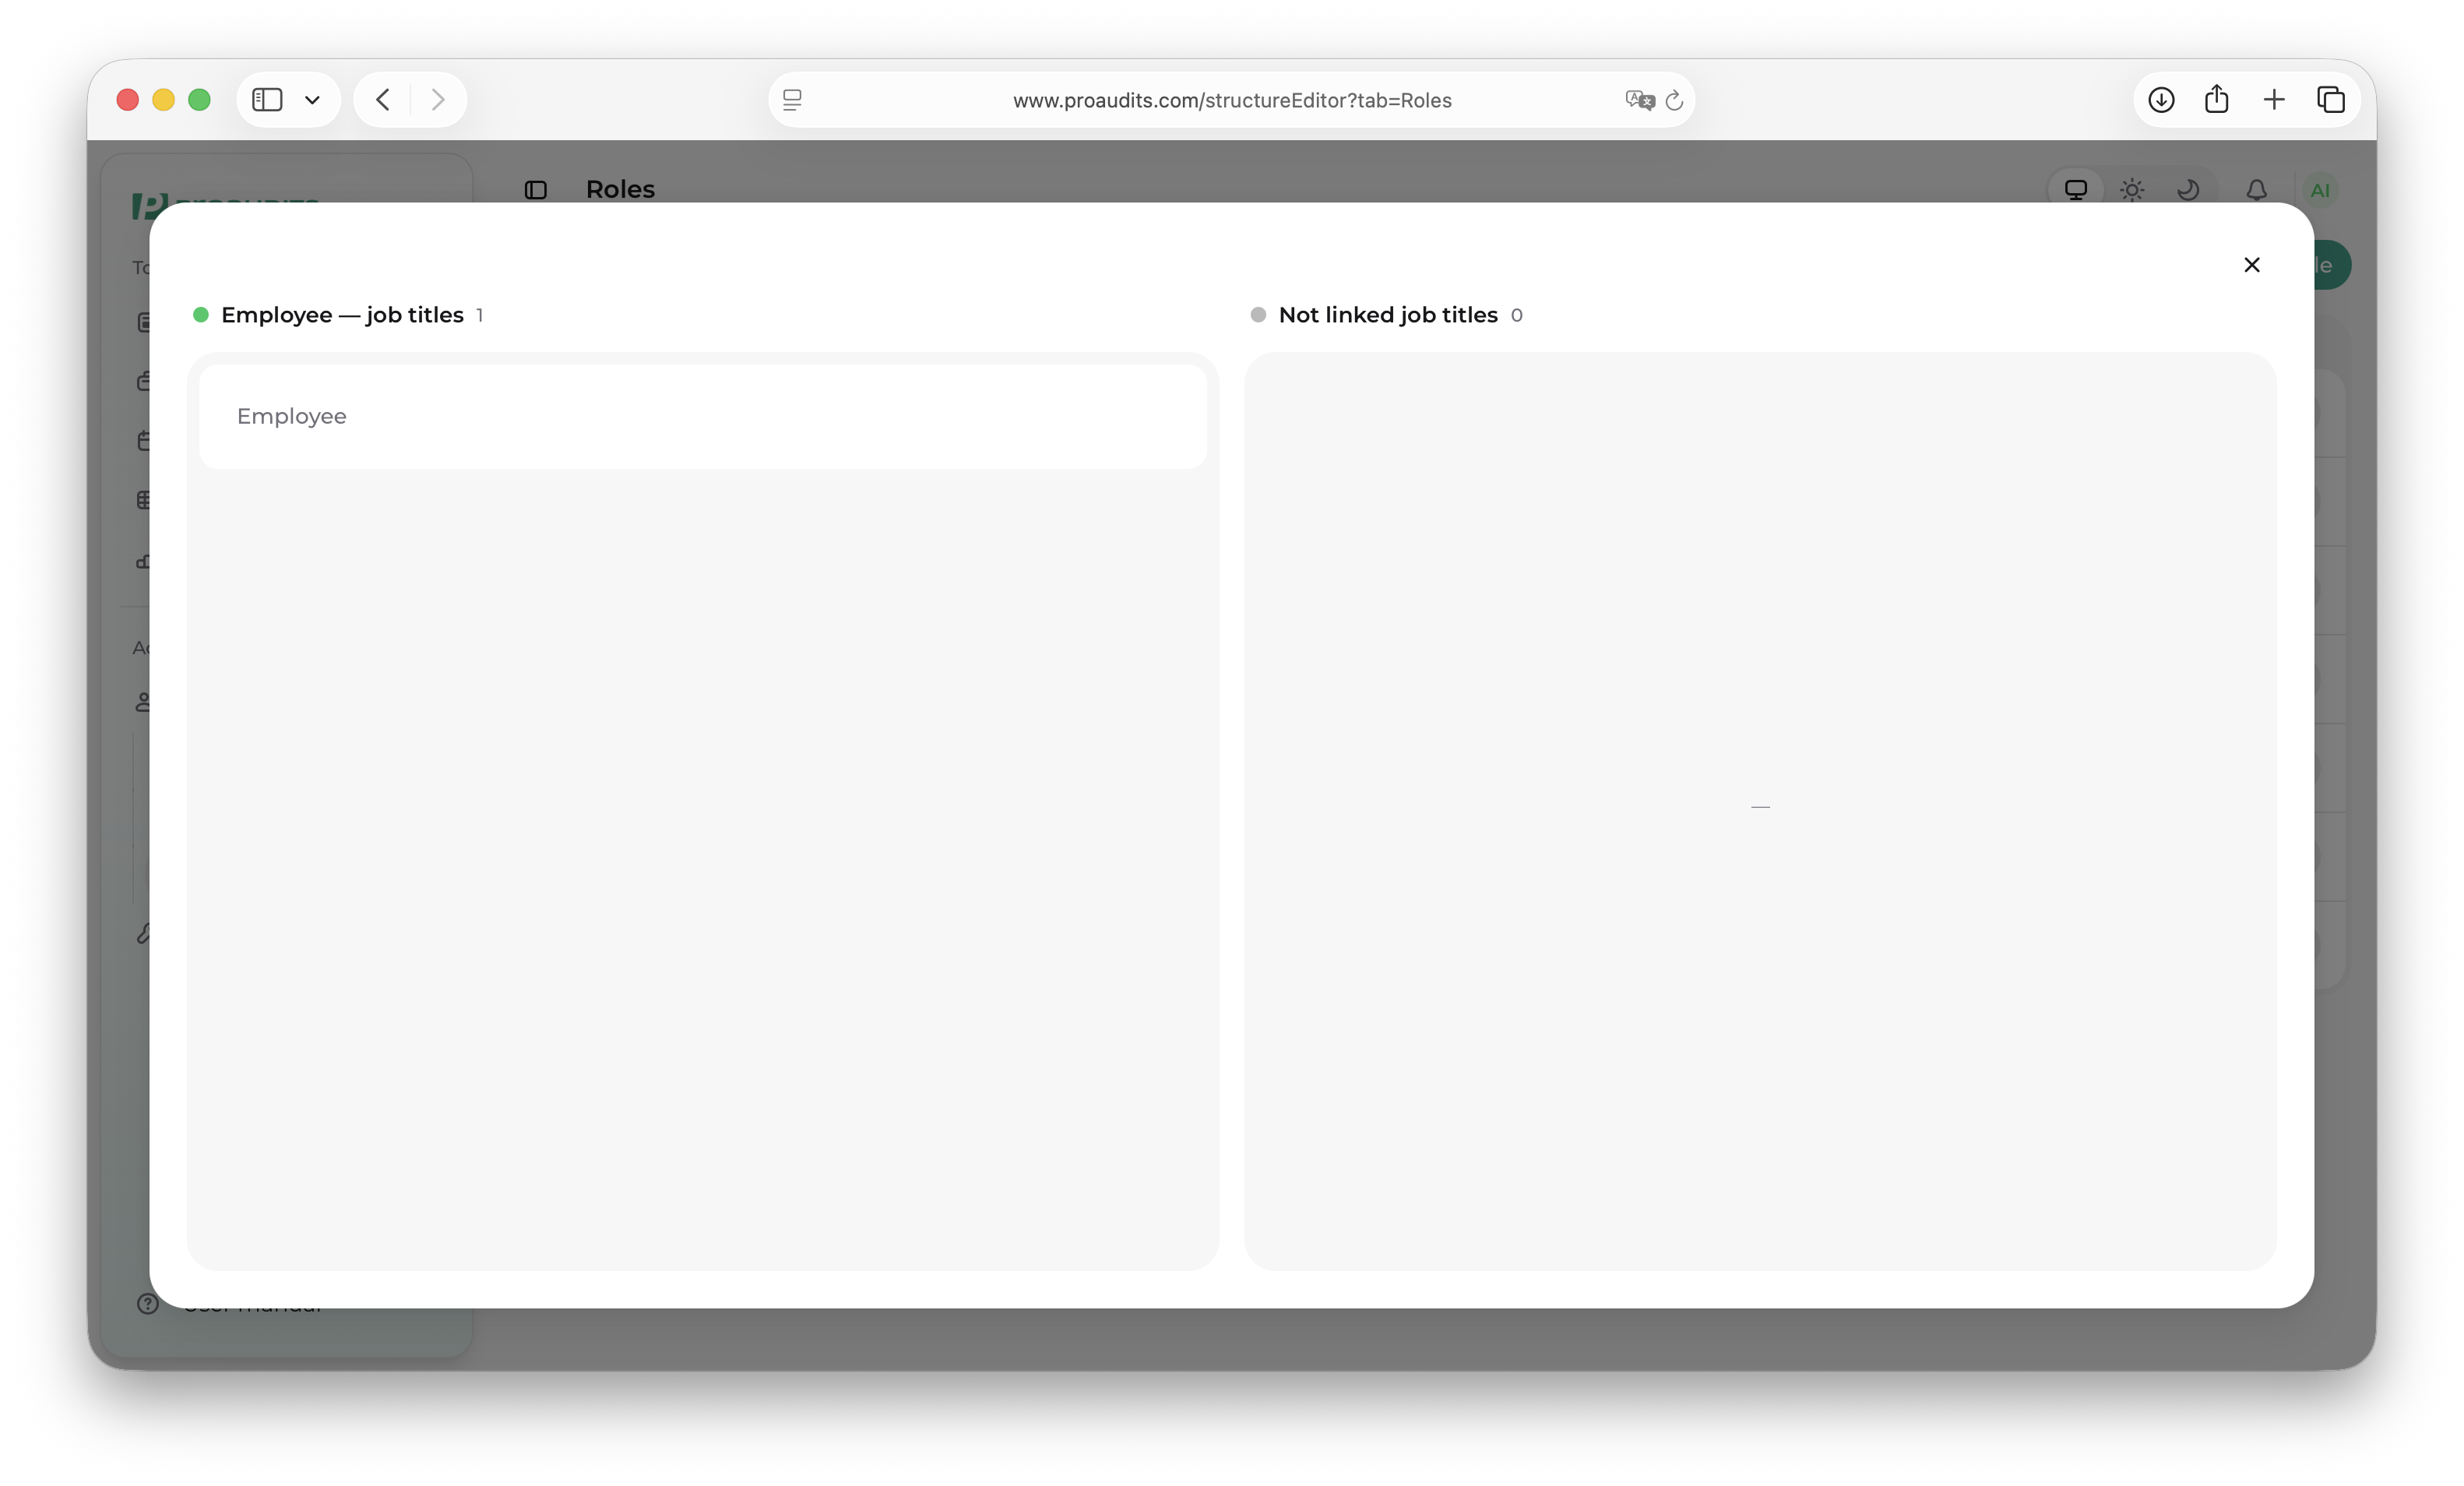
The job-titles map
This is the part of the page that wires ProAudits up to your HR / staffing integration. Click Job Titles in any role's action menu to open it.
Job titles modal
Why it matters
When an employee record is pushed into ProAudits from an external system — Bitrix, 1C, a custom HR feed, anything wired up through the integration API — the payload contains the employee's job title as a free-text string ("Senior Barista", "Старший кассир", "FOH Supervisor"). ProAudits does not know what that title means until you tell it.
The job-titles map is your translation table:
- "FOH Supervisor" → role Shift manager — Front of house
- "Senior Barista" → role Auditor — Coffee bar
- "Старший кассир" → role Store manager — Cashier line
The next time a new employee arrives with one of those titles, ProAudits auto-assigns the matching role and they land in the app with the right level of access immediately. No manual setup per employee.
How the modal works
Two columns, drag-and-drop between them:
- Left column — "{Role name} — Job titles": every HR job title currently mapped to this role.
- Right column — "Not Linked Job Titles": every HR job title ProAudits has ever seen that is not yet mapped to any role.
To map a title to this role, drag its card from the right column to the left. To unmap, drag it back to the right. Mappings save the moment a card crosses the boundary — there's no separate save button.
Where the right-column entries come from
You don't type them in. They appear automatically whenever the HR integration pushes an employee with a title that no role has claimed yet. The right column is therefore your inbox of unrecognised titles — every row there is an employee waiting to be auto-routed once you map their title.
A title can only ever be mapped to one role at a time. To re-map, open another role's job-titles modal and drag it across — the previous role loses it the moment the new role gains it.
What happens to existing employees
The map drives future arrivals only. Existing employees keep whatever role they already have. If you want to retroactively re-route employees too, do it from Employees by editing each one (or bulk-editing groups of them).
Protected vs. custom roles
ProAudits seeds your tenant with four default roles — Employee, Shift manager, Store manager, Area manager — one per level for the four lower levels. These are the protected roles:
- They cannot be deleted.
- Their level cannot be changed.
- Their name can still be edited — feel free to localise them.
Every other role you create is fully editable: rename, re-level, or delete at will.
Don't overthink it
The whole roles system was designed to be tiny on purpose. If you find yourself wanting to split a permission ("this auditor should see dashboards but not edit blanks"), the answer is almost always: change the level. The seven levels cover the patterns ProAudits supports — anything else lives in the blank's own access list (see Editor — blank content → Roles).
Summary — everything you can do here
| Action | Where |
|---|---|
| Add a role | Add Role button |
| Rename any role | Pencil icon on the Name column |
| Change a custom role's level | Click the level chip |
| Delete a custom role | Three-dot menu → Delete |
| Map an HR job title to a role | Three-dot menu → Job Titles, drag card left |
| Unmap a job title | Same modal, drag card right |
| See unmapped HR titles | Right column of any Job Titles modal |
That's the full surface area of the Roles tab.